1. Disclaimer
This guide was adapted from relevant parts of the developer guide from AB4 (https://github.com/nus-cs2103-AY1819S1/addressbook-level4). This project and AB4 are distributed under the MIT license.
2. Setting up
2.1. Prerequisites
JDK 9 or later
JDK 10 on Windows will fail to run tests in headless mode due to a JavaFX bug. Windows developers are highly recommended to use JDK 9. IntelliJ IDE
IntelliJ by default has Gradle and JavaFx plugins installed. Do not disable them. If you have disabled them, go to File > Settings > Plugins to re-enable them.
2.2. Setting up the project in your computer
Fork this repo, and clone the fork to your computer
Open IntelliJ (if you are not in the welcome screen, click File > Close Project to close the existing project dialog first)
Set up the correct JDK version for Gradle
Click Configure > Project Defaults > Project Structure
Click New… and find the directory of the JDK
Click Import Project
Locate the build.gradle file and select it. Click OK
Click Open as Project
Click OK to accept the default settings
Open a console and run the command gradlew processResources (Mac/Linux: ./gradlew processResources). It should finish with the BUILD SUCCESSFUL message. This will generate all resources required by the application and tests.
Open XmlAdaptedtask.java and MainWindow.java and check for any code errors
Due to an ongoing issue with some of the newer versions of IntelliJ, code errors may be detected even if the project can be built and run successfully
To resolve this, place your cursor over any of the code section highlighted in red. Press ALT+ENTER, and select Add '--add-modules=…' to module compiler options for each error
Repeat this for the test folder as well (e.g. check XmlUtilTest.java and HelpWindowTest.java for code errors, and if so, resolve it the same way)
2.3. Verifying the setup
Run the seedu.address.MainApp and try a few commands
Run the tests to ensure they all pass.
2.4. Configurations to do before writing code
2.4.1. Configuring the coding style
This project follows oss-generic coding standards. IntelliJ’s default style is mostly compliant with ours but it uses a different import order from ours. To rectify,
Go to File > Settings… (Windows/Linux), or IntelliJ IDEA > Preferences… (macOS)
Select Editor > Code Style > Java
Click on the Imports tab to set the order
For Class count to use import with '*' and Names count to use static import with '*': Set to 999 to prevent IntelliJ from contracting the import statements
For Import Layout: The order is import static all other imports, import java., import javax., import org., import com., import all other imports. Add a <blank line> between each import
Optionally, you can follow the UsingCheckstyle.adoc document to configure Intellij to check style-compliance as you write code.
2.4.2. Updating documentation to match your fork
After forking the repo, the documentation will still have the SE-EDU branding and refer to the se-edu/addressbook-level4 repo.
If you plan to develop this fork as a separate product (i.e. instead of contributing to se-edu/addressbook-level4), you should do the following:
Configure the site-wide documentation settings in build.gradle, such as the site-name, to suit your own project.
Replace the URL in the attribute repoURL in DeveloperGuide.adoc and UserGuide.adoc with the URL of your fork.
2.4.3. Setting up CI
Set up Travis to perform Continuous Integration (CI) for your fork. See UsingTravis.adoc to learn how to set it up.
After setting up Travis, you can optionally set up coverage reporting for your team fork (see UsingCoveralls.adoc).
Coverage reporting could be useful for a team repository that hosts the final version but it is not that useful for your personal fork. Optionally, you can set up AppVeyor as a second CI (see UsingAppVeyor.adoc).
Having both Travis and AppVeyor ensures your App works on both Unix-based platforms and Windows-based platforms (Travis is Unix-based and AppVeyor is Windows-based)
2.4.4. Getting started with coding
When you are ready to start coding,
Get some sense of the overall design by reading Section 2.1, “Architecture”.
Take a look at Appendix A, Suggested Programming Tasks to Get Started.
3. Design
3.1. Command Component
Command is refactored to be implemented using a template method pattern. The rationale is that there are shared codes and invariants among all the executions of the command classes such as the method to update the status of tasks to overdue if their due date is past current time.
The common patterns in execution are implemented in the execute function of the command class which is declared final.
Concrete implementations of each execute function is implemented in the executePrimitive function of each subclass of command.
The implementation for executePrimitive fill the "variant" portion of the model template. Note that execute primitive is implemented as an
abstract method in command.
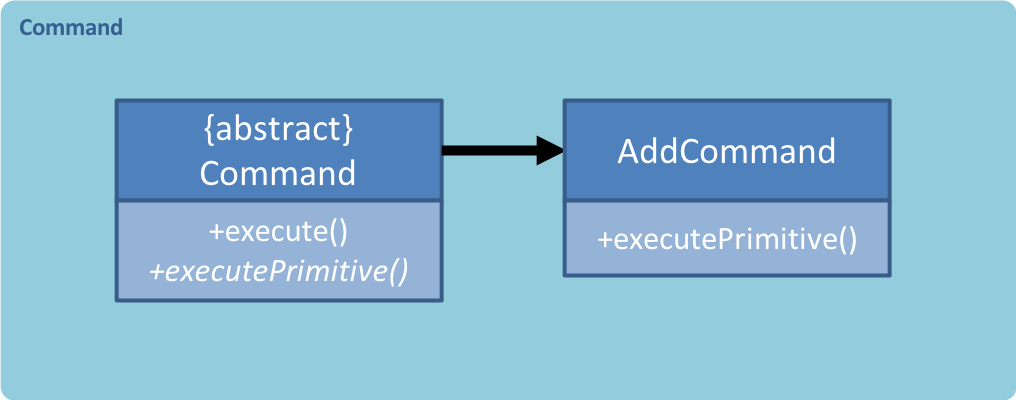
Simplified class diagram for the command component
4. Implementation
This section describes some noteworthy details on how certain features are implemented.
4.1. Achievement mechanism
4.1.1. Structural Overview
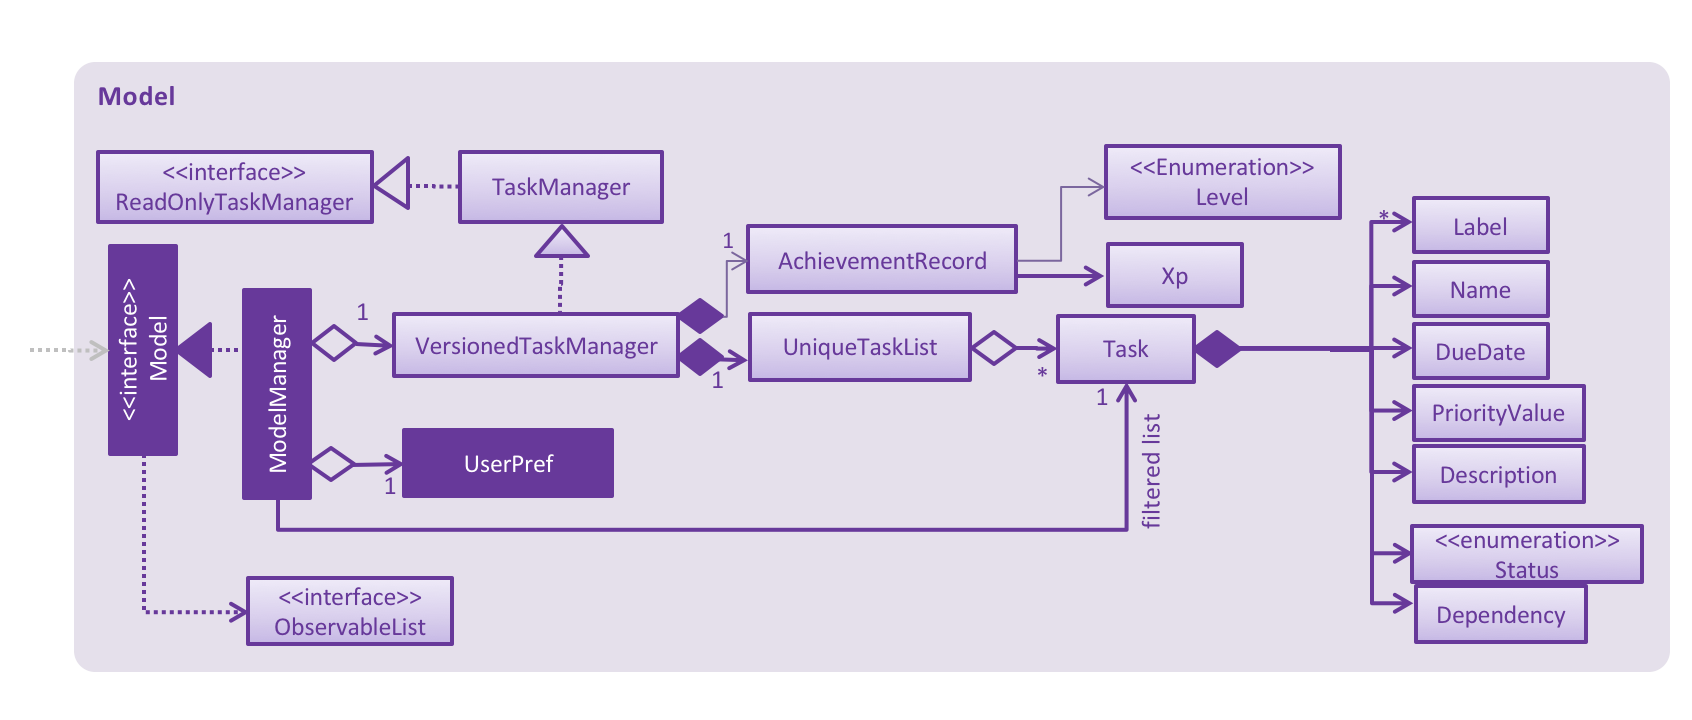
The achievement mechanism is facilitated by AchievementRecord. TaskManager is added with an AchievementRecord on top
of the original UniqueTaskList.
AchievementRecord stores the achievement information of the user internally. These information include
the current Xp, current Level, total number of tasks completed across all time, as well as the xp earned and number of tasks
completed by the user today and this week. To facilitate the tracking of the time-based achievements(namely xp earned and number of
tasks completed by today and this week), AchievementRecord also stores the date and time when the time-based achievement fields should
be reset.
AchievementRecord also contains a field displayOption that specifies which set of achievement information should be
displayed on UI. The field is updated through the achievements all-time, achievements today or
achievement this week commands.
The storage of the AchievementRecord is facilitated by XmlAdaptedAchievementRecord which is saved together with
the list of XmlAdaptedTask in the SerializableTaskManager.
Integration of AchievementRecord in Model component:
4.1.2. Basic Mechanism
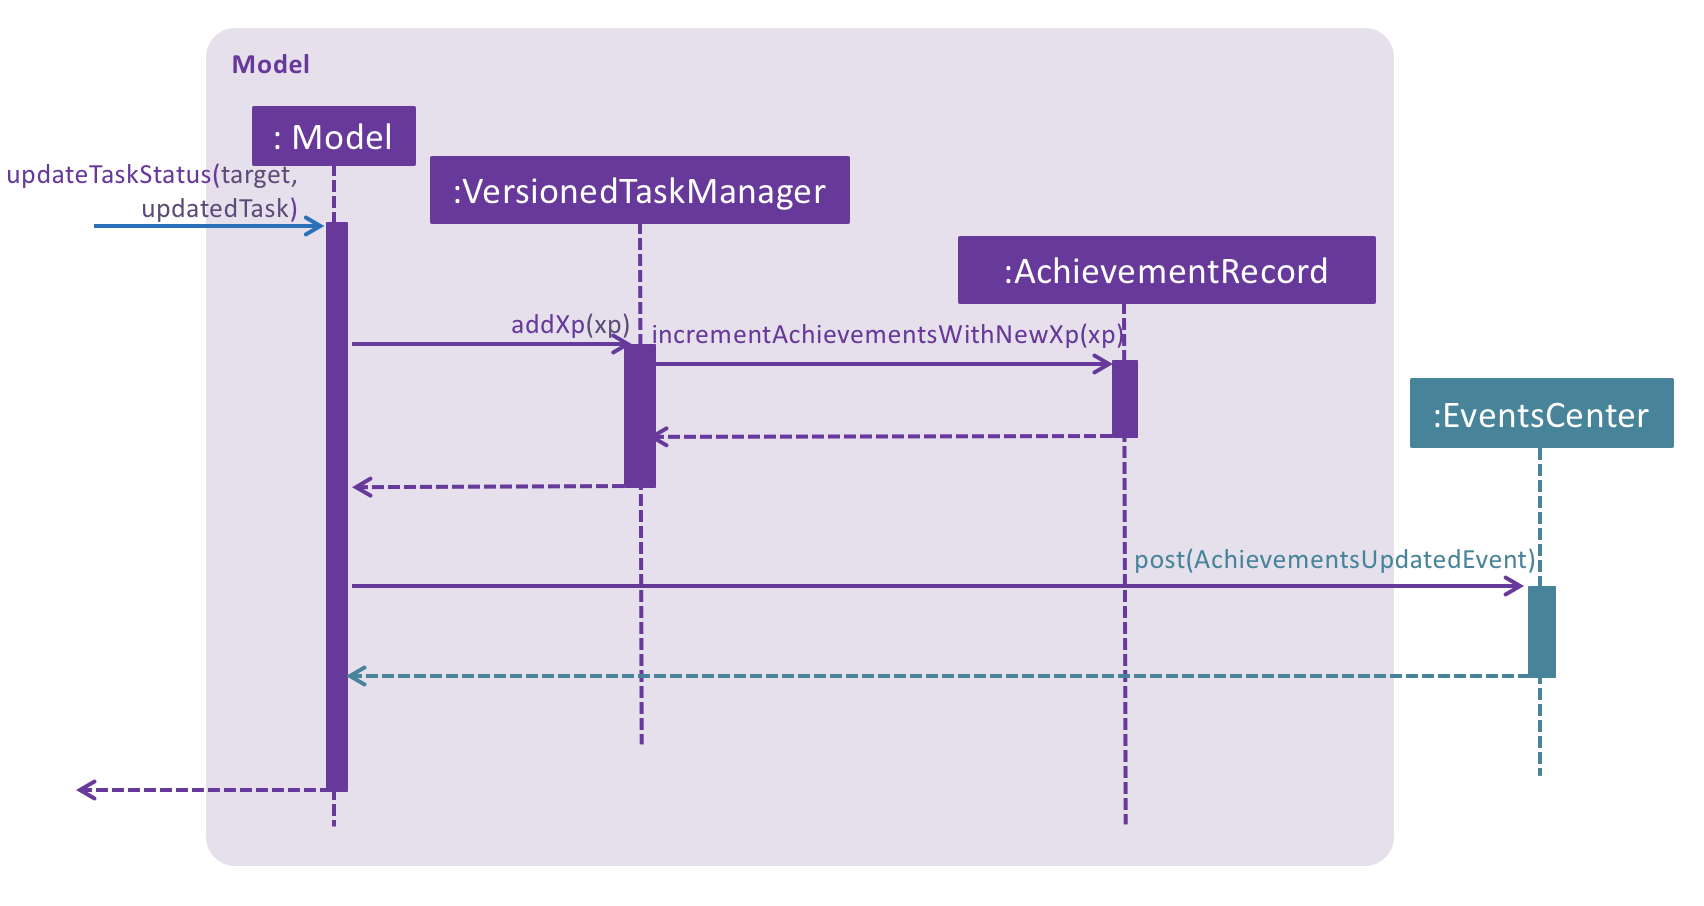
An updateTaskStatus method is implemented in ModelManager and exposed in the Model interface, this method is
called in the execution of complete command. Upon completion of a task, the status of task is updated to COMPLETED,
along with that, the AchievementRecord is also updated with the new xp. Current xp, number of tasks completed
increases, current level is recalculated and updated to match current xp. As the time based achievement fields should
be reset every day or week, checks are performed and the fields are reset if necessary. Xp earned and number of tasks
completed today and this week is then increased as well.
An updateAchievementDisplayOption method is implemented in ModelManager and exposed in the Model interface, which
is called in the execution of the achievements command. Before the displayOption field of the AchievementRecord is
updated, checks are perform to reset the time based achievement fields if necessary as well to ensure that they are up
to date. The displayOption is then updated, an AchievementsUpdatedEvent is posted to notify UI, who then display
the set of achievement information as specified by user’s command.
Sequence diagram of the achievement mechanism:

Activity diagram of the update of daily time-based achievement fields(today’s xp, today’s number of tasks completed):

4.1.3. Event-driven Interaction with other components
The achievement mechanism follows the event-driven interaction of model component with Storage and UI components.
When a task is marked as complete, both the UniqueTaskList and the AchievementRecord of the task manager is updated
to reflect the new status of the task and the new achievement information. A TaskManagerChangedEvent is then posted
to EventsCenter and handled by both Storage and UI components to save the changes and update the status bar.
On top of the TaskManagerChangedEvent, an AchievementsUpdatedEvent is posted by the Model component every time
the AchievementRecord is update(on task completion or change of display option). This event is handled by the
AchievementPanel UI component which then update the achievement information displayed.
4.1.4. Design Considerations
Aspect: Associations Among TaskManager,UniqueTaskList and AchievementRecord
-
Alternative 1 (current choice): Integrate
AchievementRecordintoTaskManageras an additional field besides the existingUniqueTaskList.-
Pros: Easy to implement, greater efficiency. As achievement information (eg. xp, level) changes always come together with task status changes, we can update both the
UniqueTaskListandAchievementRecordthen save theTaskManageronly once. Undo/redo commands that revert the status tasks would revert the achievement information as well, matching between task status and corresponding achievements is guaranteed. -
Cons:
TaskManagernow has another reason of change, breaks Single Responsibility Principle.
-
-
Alternative 2: Implement
AchievementRecordas another component outside ofTaskManagerand let them communicate through events.-
Pros: Follows Single Responsibility Principle.
TaskManagerhandles only task operations, achievement information is handled byAchievementRecordindependently. -
Cons: Logic is duplicated twice. For example, we would need to implement a
VersionedAchievementRecordbesides the currentVersionedTaskManagerto support undo/redo. A lot of overhead will result from the communication betweenTaskManagerandAchievementRecordas well.
-
Aspect: Managing display option of AchievementRecord.
-
Alternative 1 (current choice): Use and additional field
displayOptioninAchievementRecordto keep track of display option. The field is updated when user uses theachievements all-time,achievements todayorachievement this weekcommands to specify their choices.-
Pros: As the display option is saved inside the
AchievementRecordofTaskManager, undo/redo of the achievements command is easily supported.AchievementPanelUI component can simple decide which set of achievements to display based on the current value of thedisplayOptionfield. -
Cons:
AchievementRecordneeds to save the display option besides the achievement information, this breaks the Single Responsibility Principle.
-
-
Alternative 2: Use
AchievementPanelUI component to save and manage the update of display option.-
Pros: Follows Single Responsibility Principle.
AchievementRecordhandles only achievement information. Greater cohesion as the display of achievements is handled by theAchievementPanelUI component alone.AchievementPanelUI component does not need to rely onAchievementRecordmodel to decide which set of achievement information to display. -
Cons:
AchievementPanelneeds to save the states of thedisplayOptionto support undo/redo. Undo/redo of the achievements command needs to be implemented and handled separately from all other commands, breaks abstraction.
-
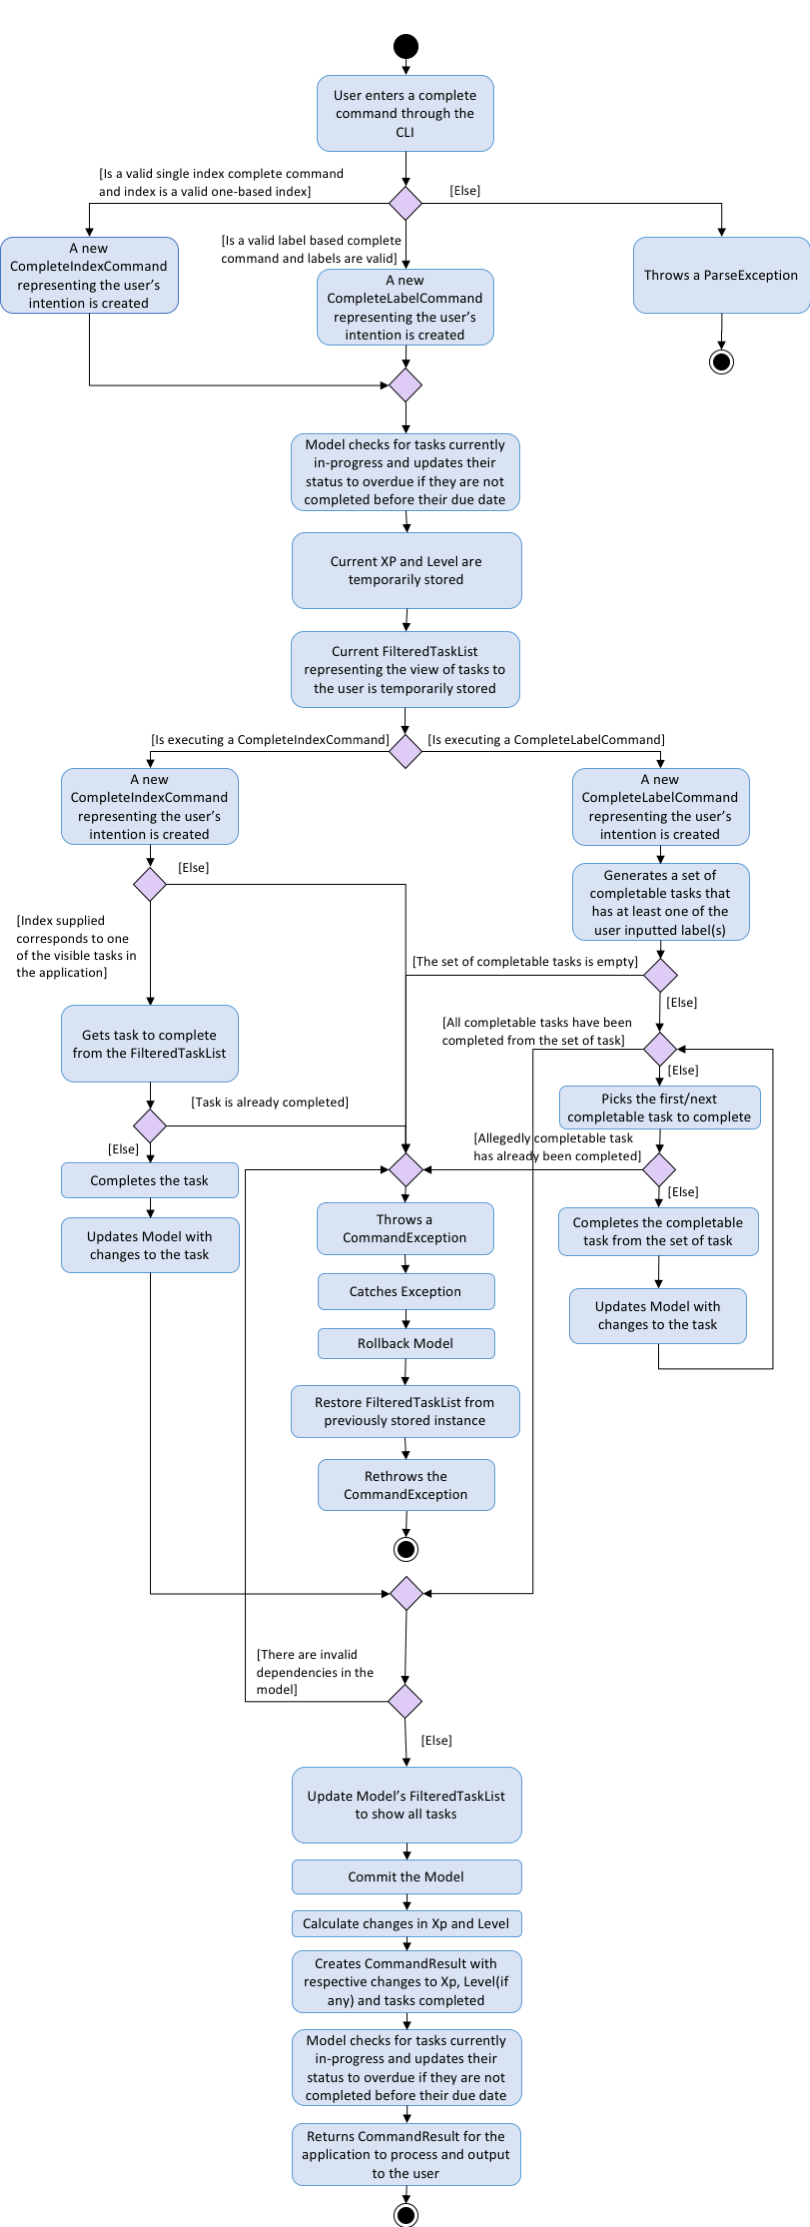
4.2. Batch Completion via Label feature
This section and its subsections are written with reference to commit: 9ddb0ffddf5d769d357e28fbd5337011614e7b14
The CompleteLabelCommand class inherits from the CompleteCommand class. It takes in a
Task<Predicate> while another subclass of CompleteCommand, CompleteIndexCommand
takes in an Index to support polymorphic behavior for both a single operation and batch operation.
Common execution paths for both subclasses are implemented in CompleteCommand class using the
template method pattern to let subclasses implement varying behaviour and avoid duplication in
the code. As CompleteLabelCommand is coupled to CompleteCommand, it is imperative to grasp a
general idea of the flow of execution before attempting to understand the following section. It
assumes the developer is familiar enough with the codebase to understand where each method call
are with respect to the activity diagram.
If you require involved context for the execution of the whole CompleteCommand please refer
to: Appendix E: Complete Command Activity Diagram
4.2.1. Current Implementation
The batch completion mechanism is facilitated by CompleteLabelCommand. It extends
CompleteCommand and encapsulates the internal logic of finding completable tasks via a supplied
Task<Predicate>. Additionally it is able to complete and rollback multiple tasks atomically.
These are the methods in the CompleteLabelCommand class supporting the batch completion:
-
#completeAllTasksReturnStringOfTasks(Model) -
#completeTasksInSetUpdateModel(Model, Set<Task>) -
#completeOneTaskReturnStringOfTasks(Task, Model)
Premise: The application has several tasks tagged with the label: many.
Step 1. The user executes complete l/many command to complete all the tasks labelled many.
Step 1.1. The argument String is passed to the CompleteCommandParser, which checks to see
if the user’s input contains a label, then calls CompleteCommandParser#parseLabel(…). As a
result a new CompleteLabelCommand instance is created. It consumes a
LabelMatchesAnyKeywordsPredicate which will only test true against a Task
containing a many label.
Step 1.2. A chain of event triggers, ultimately calling CompleteCommand#execute(…) for the
created instance. Subsequently CompleteLabelCommand#completeAllTasksReturnStringOfTasks(…) is
called which encapsulates the logic for updating all valid completable tasks matching the supplied
predicate.
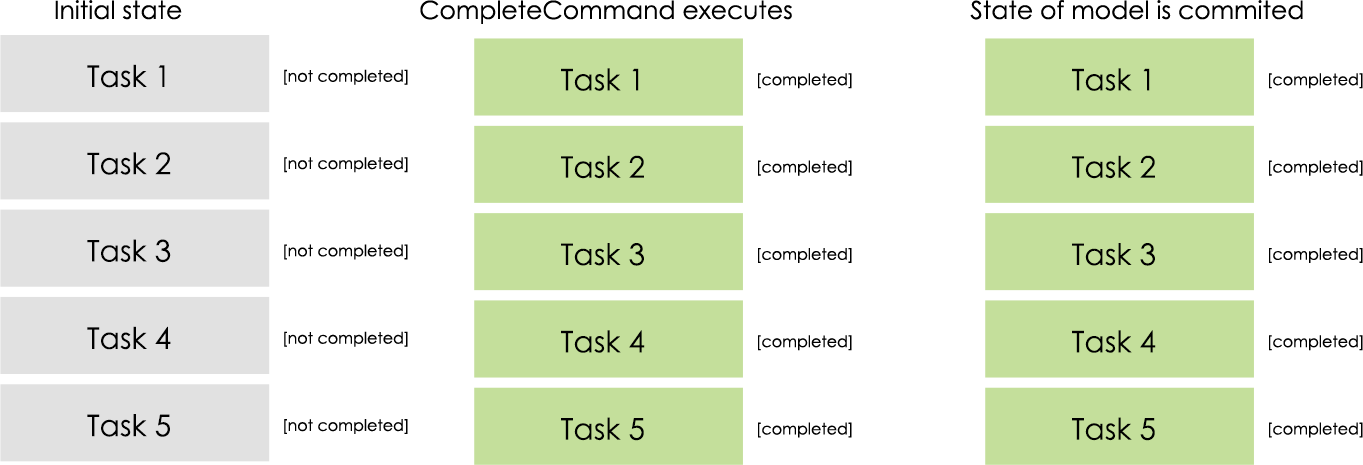
Step 1.2.1 If all tasks are updated successfully, Model#commit() will be called.
Step 2. The user sees all tasks previously displayed on the screen which matches the label change
its status to COMPLETED
Extensions
Step 1.2.1.a If all tasks are not updated successful, Model#rollback() will be called. All
uncommitted changes will be reset to the current state pointed to in taskManagerStateList.
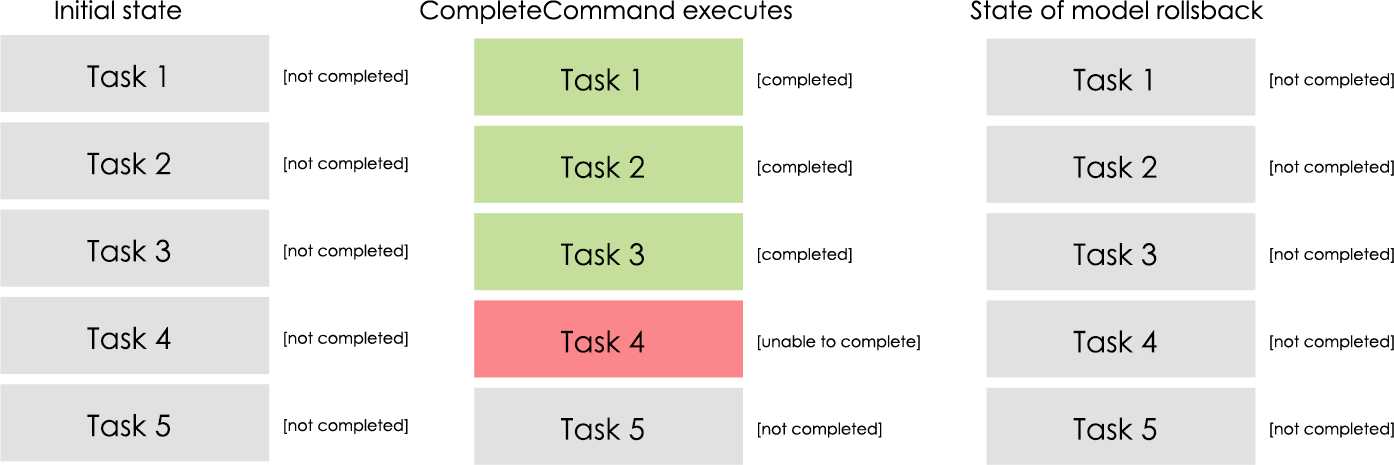
Step 1.2.1.a1 Then user will see a relevant error message reporting what went wrong.
Auxiliary Changes
Additionally, in order to facilitate the finding of task and completing tasks atomically, the following auxiliary classes have been created / extended as a result:
-
LabelMatchesAnyKeywordsPredicate— Extension of the functional interfacePredicate<E>-
This class is required to encapsulate the logic of determining if a task has a
Labelmatching any of the desiredLabel(s) specified (case-insensitive).
-
Updated
-
Model— Extends with a rollback() method -
ModelManager— Extends with a rollback() method -
VersionedTaskManager— Implements a rollback() method -
CompleteCommandParser— Extended to parse two different formats,IndexandLabelbased commands
4.2.2. Design Considerations
Aspect: Implementation of atomicity
-
Alternative 1 (current choice): Calling
Model#rollback()when an exception is caught, otherwiseModel#commit()-
Pros: This implementation defensively codes for scenarios where CommandExceptions are thrown, thus ensuring that there are no partially-done batch operation resulting in a possibly invalid state.
-
Cons: Requires extending the Model class and depending on its functionality; resulting in tighter coupling.
-
-
Alternative 2: Doing a check on all tasks to see if they can be completed successfully. If yes, then proceed to update the model and commit else throw an exception.
-
Pros: Looser coupling as checks are implemented within CompleteCommand.
-
Cons: Unable to handle unforeseen failure to complete, resulting in a partially committed batch operation.
-
Aspect: Handling different CompleteCommand behaviour
-
Alternative 1: Overloading the constructors and implementing the logic for both behaviours within.
-
Pros: This is one easy way of grouping possibly tightly coupled code together into a single class; thus reducing coupling.
-
Cons: Goes against the Separations of Concerns principle.
-
-
Alternative 2 (current choice) Implementing
CompleteCommandas an abstract class. Each class would then inherit and implement the abstract methods, providing different polymorphic behaviours forCompleteCommand. Currently, the two different behaviours implemented are: completion via index and completion via label.-
Pros: Clear separation of concern, respecting the Single Responsibility Principle. Additionally, there is less duplicated code as similar code can be implemented in the
CompleteCommandclass. -
Cons: Harder to initially design properly, also sub-classes of CompleteCommand are now coupled to CompleteCommand.
-
Alternative 2 was considered for CompleteCommandParser. However in this case, it is hard to determine whether
the argument is meant for CompleteLabelCommand or CompleteIndexCommand until actually parsing, As such, it could be
viewed that the job of figuring out what to parse the argument as is subsumed under the concerned of parsing. Thus
CompleteCommandParser is viewed to still respect the Single Responsibility Principle, and its separation may result in
a high amount of coupling.
|
Aspect: Representation of predicate to be stored by CompleteCommand
-
Alternative 1 (current choice): As an explicit implemented class
LabelMatchesAnyKeywordsPredicate.-
Pros: Notion of equality can be overloaded. This allows for proper checking of equality in every class composing the
LabelMatchesAnyKeywordsPredicate. In sum, it allows for the checking of structural equality rather than just referential equality. -
Cons: Creation of an extra class requires more understanding by developers to pick up the quirks as opposed to commonly recognised Alternative 2
-
-
Alternative 2: Declaration of predicate as an anonymous function
-
Pros: Easily understood by developers who are familiar with Functional Interfaces being Single Abstract Methods.
-
Cons: Inability to properly check for equality.
-
4.3. Model Rollback feature
This section and its subsections are written with reference to commit: 9ddb0ffddf5d769d357e28fbd5337011614e7b14
4.3.1. Current Implementation
Allows for any uncommitted changes to be discarded.
-
Model— Extends with arollback()method -
ModelManager— Extends with arollback()method -
VersionedTaskManager— Implements arollback()method
When VersionedTaskManager#Rollback() is called, the current data is reset to the state of the
latest commit. Internally, VersionedTaskManager#resetData(…) is called to reset the data to
the commit pointed by the currentStatePointer in the taskManagerStateList.
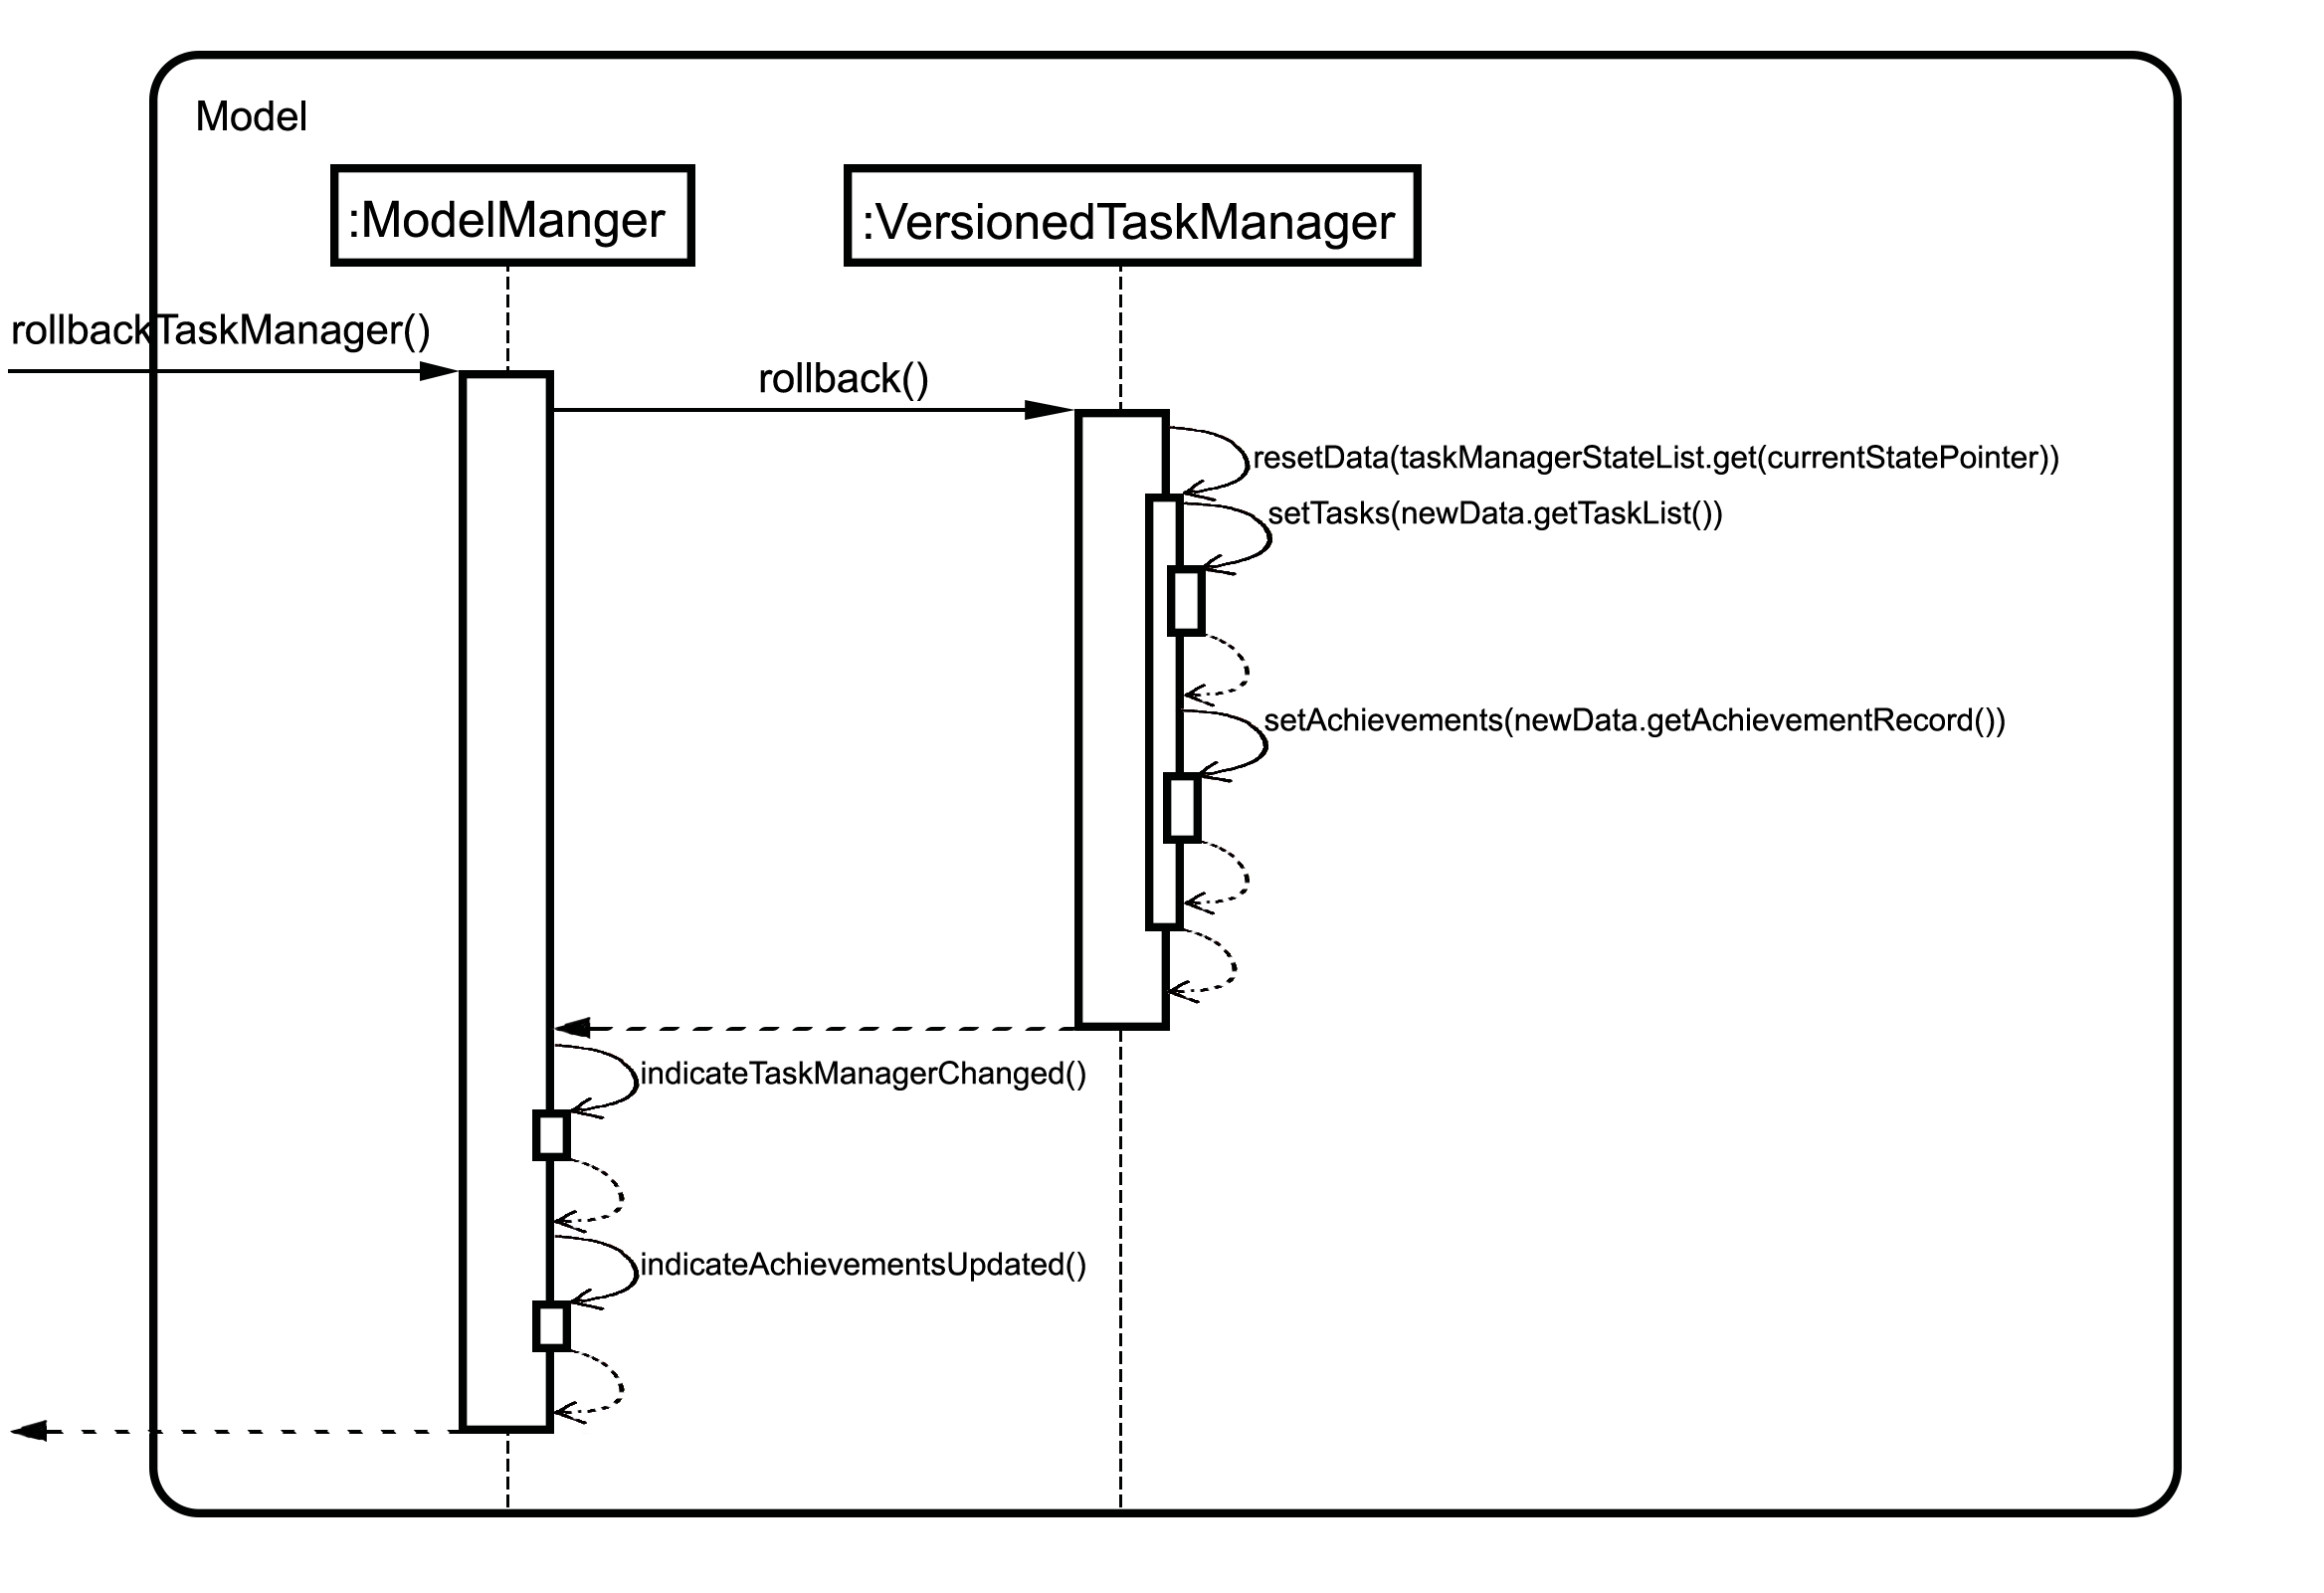
Calls to the Commons/Event component has been omitted for brevity.
4.4. Dependency Feature Modelling
4.4.1. Current Implementation
The dependencies of a task is modelled by an embedded Dependencies object in the task. This object represents dependencies with
a hashset that contains the hashcodes of the tasks that the task is dependent upon.
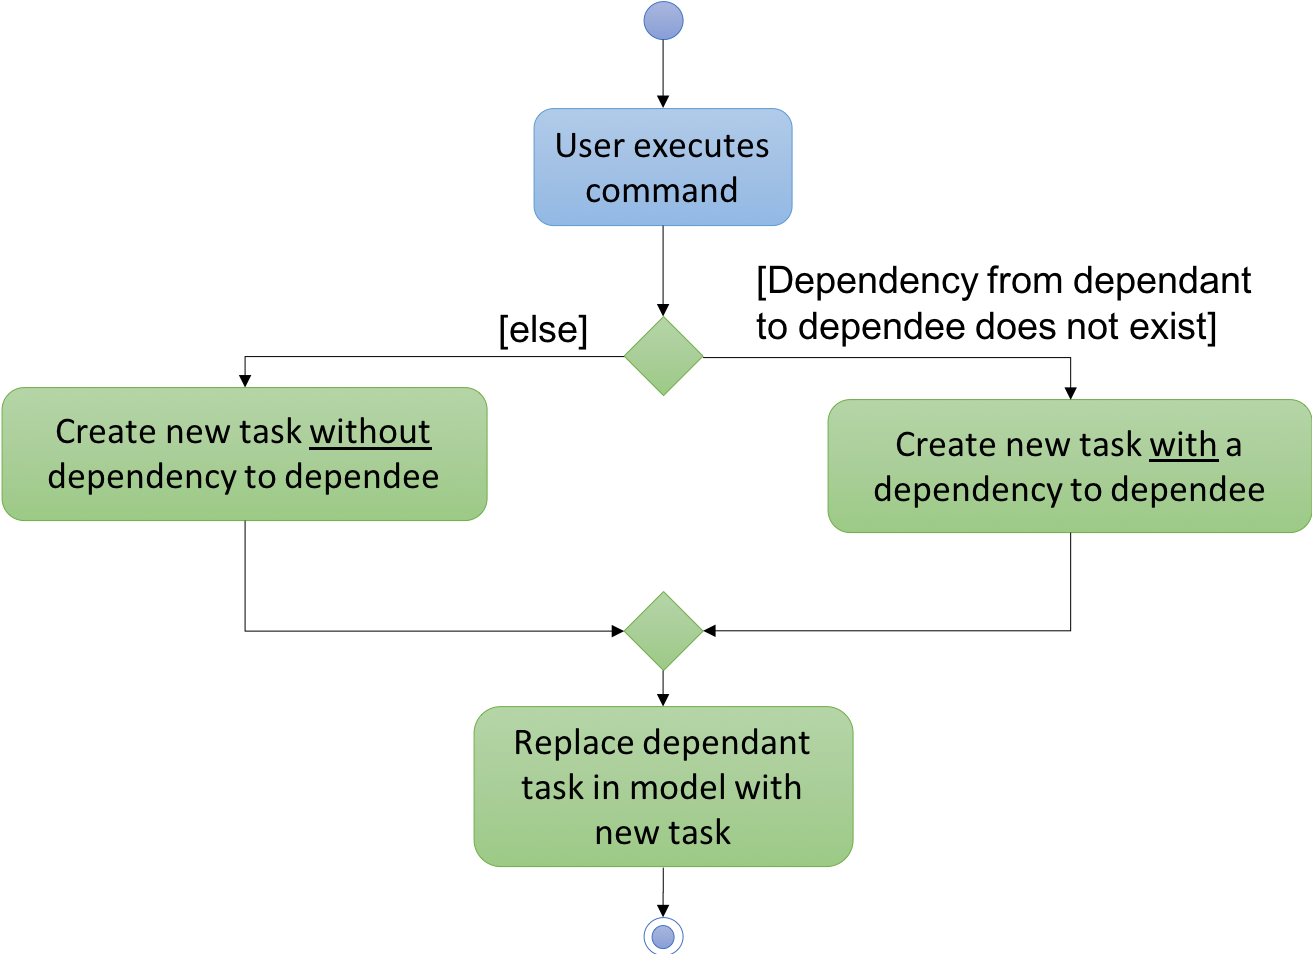
The dependencies between tasks are added or removed using the dependency command. If a given task A is dependent on a given task B, task A is the dependant task while task B is the dependee task.
When deleting a task, all dependencies to the deleted task will be removed. When editing a task, all dependencies to the edited task will be updated with the hashcode of the new edited task.
Activity diagram for the dependency command (dependencies are toggled using the command)
4.4.2. Design Considerations
Aspect: Modelling a dependency
-
Alternative 1(current choice): Dependencies specified by unique hashcodes of tasks
-
Pros: When a task dependency is updated, the updating of tasks do not propagate . (Refer to alternative 2)
The hashcodes are generated without a task’s dependencies. Hence, when updating a given task A, tasks dependent to task A do not need to be recreated as the hashcode of the new task A is the same hashcode as the old task A. -
Cons: Some functions such as UI display require details of the dependee tasks. Additional computation required to find reference of the dependee task from its hashcode.
-
-
Alternative 2: Dependencies specified by (references to) the Task objects themselves
-
Pros: Easy reference the task object.
-
Cons: Introduces unnecessary complications.
1)Tasks are immutable. Whenever a task dependency is added or removed a new task is created. All tasks dependent to the updated task have to have their dependencies updated. Consequently, all tasks that are dependent to the the tasks dependent to the original task have to have their dependencies updated as well.
2)[Assumption: In storage, task dependencies are specified by hashcodes of task] When retrieving data from storage, the parser needs to first load the dependencies as a set of hashcodes before transforming the hashcodes to references to tasks only when all tasks are instantiated from storage.
-
4.5. Modelling Dependency Checks
4.5.1. Current Implementation
The DependencyGraph is the graph representing the dependencies between the task objects. A graph model needs to be created
so useful functions can be implemented such as cyclic check, topological sort, or a depth first search of the graph.
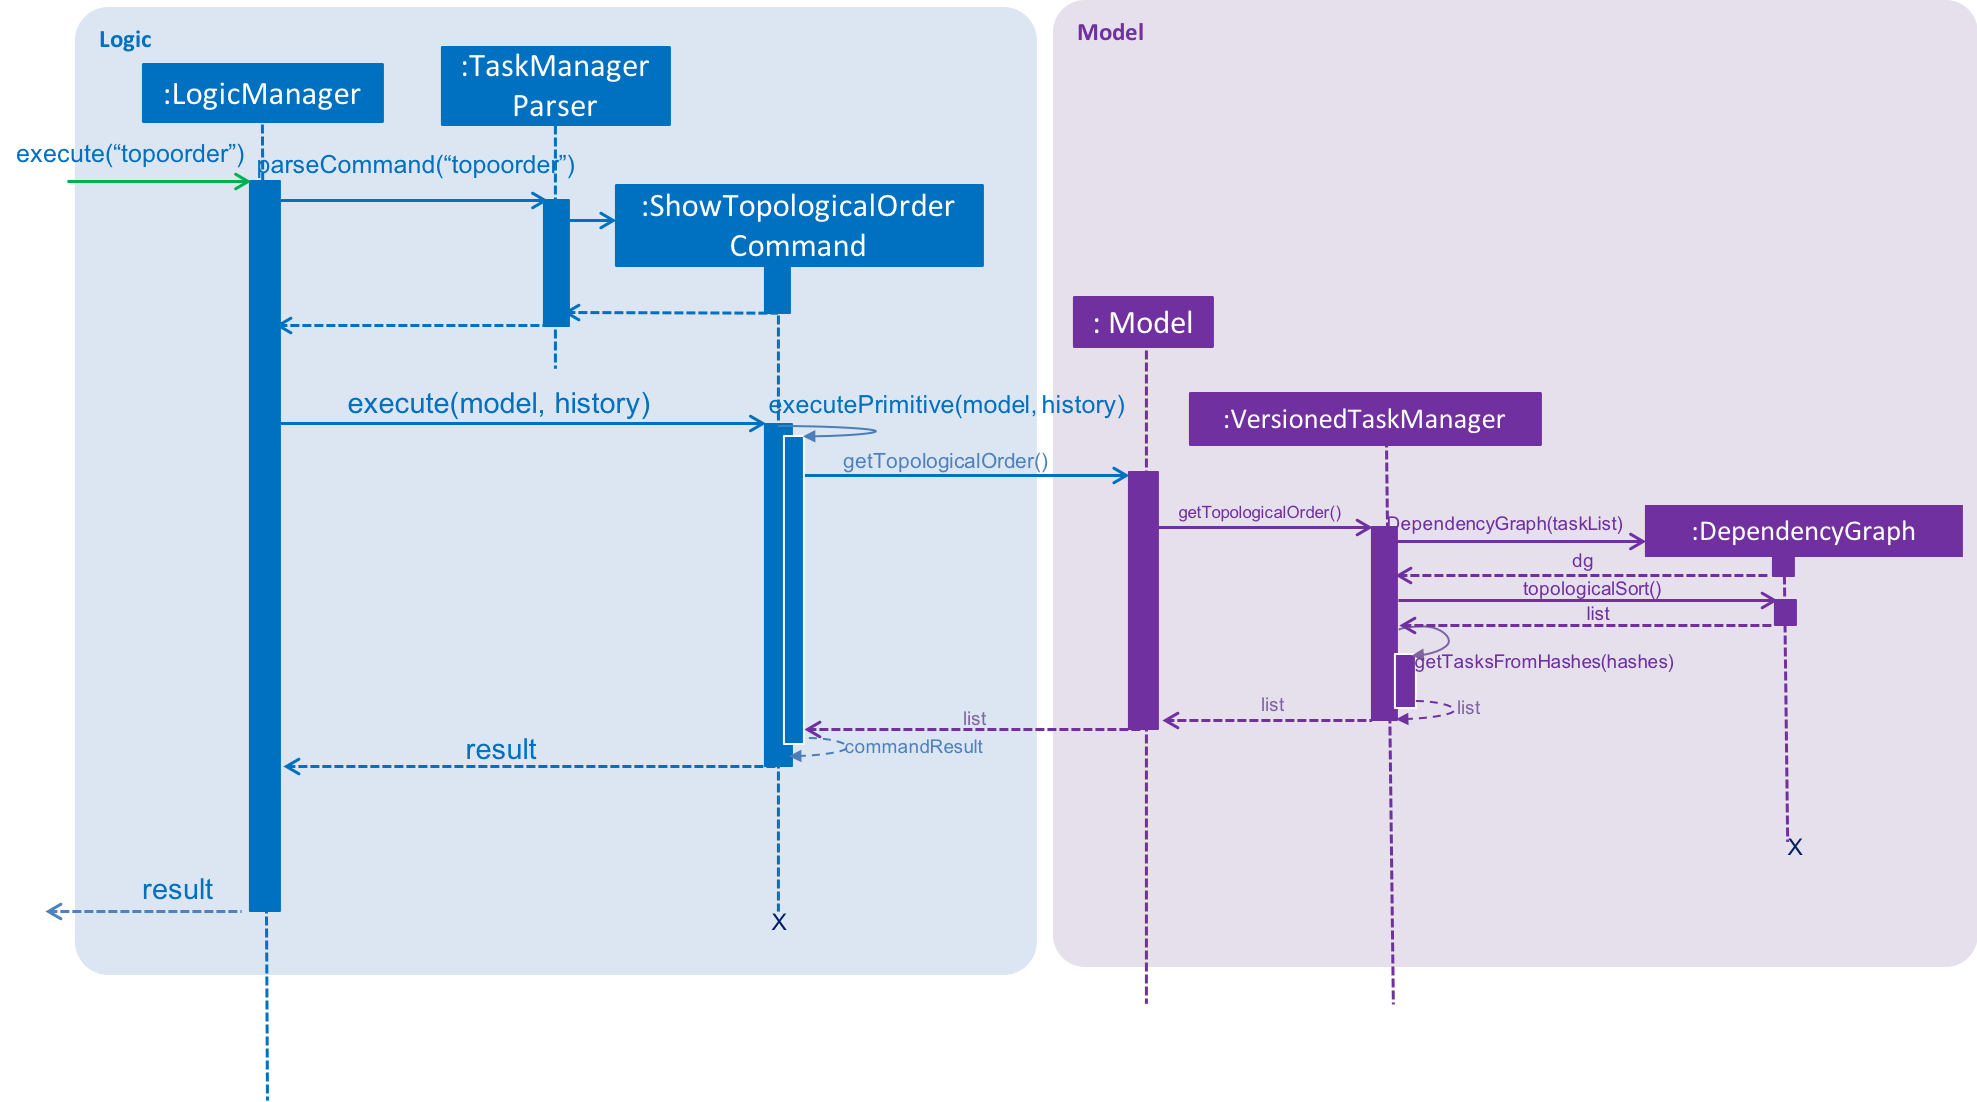
Sequence Diagram of the Show Topological Order Command (DependencyGraph on the right hand side of diagram)
DependencyGraph is instantiated whenever it is needed. Transformations such as inverting the graph or pruning COMPLETED
tasks from graph.
4.5.2. Design Considerations
Aspect: Real-time graph or graph instantiated on function call.
-
Alternative 1(current choice): Graph is only instantiated when needed.
-
Pros:
1) Graph does not have to be maintained at every relevant command
2) Graph can be transformed (pruning/inverting) without worrying about modifying the original dependencies object -
Cons: Slight increase in latency, but mitigated by the fact that a typical user won’t have an extremely large amount of tasks.
-
-
Alternative 2: Graph created on start-up and maintained during run-time
-
Pros: Slightly faster speed for dependency related commands
-
Cons: Upkeep of graph is complex to implement especially with the immutable nature of the Tasks
-
Aspect: Task dependencies modelled with a graph
-
Alternative 1(current choice): Using a graph.
-
Pros:
-
With a graph, major problems with task dependency can be identified. The biggest problem is cyclic dependency, which is when a set of tasks have a dependency to each other and hence they cannot be completed because they depend on each other.
-
A topological sort can also be performed on the graph to order tasks by the number of dependencies.
-
-
Cons: nil
-
4.6. Effective Due Date
4.6.1. Current Implementation
Effective Due Date (EDD) is a derived field in the UI. It is the earliest due date among all tasks directly or indirectly dependent on the task, including the task itself.
Steps to find effective due date of task A:
-
Prune completed tasks and dependencies to COMPLETED tasks from the
DependencyGraph -
Invert the dependencies in the
DependencyGraph(to allow graph traversal in the opposite direction)
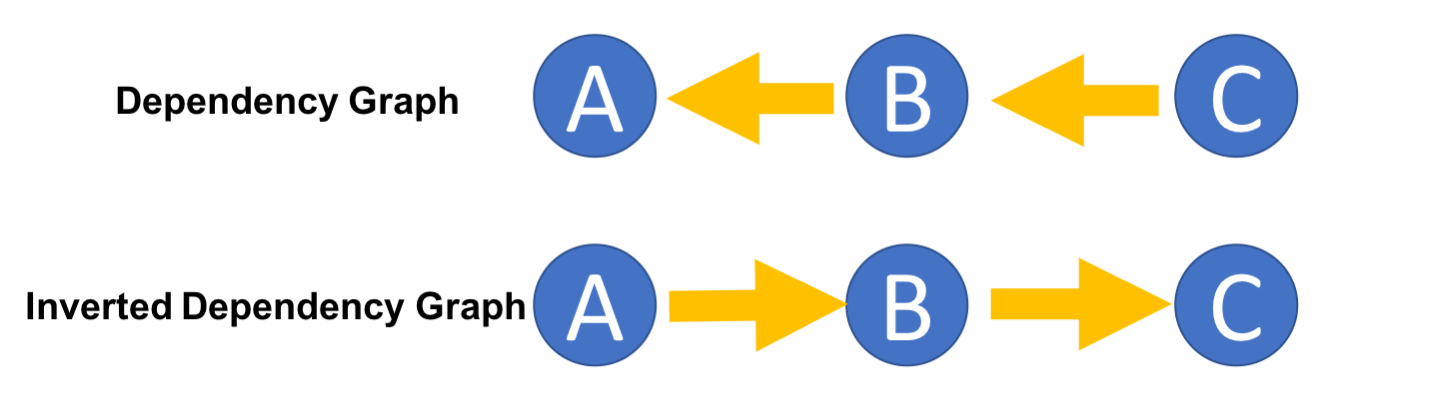
Diagram for effective due date implementation
-
Perform a depth first search from Task A to find earliest effective due date among all children (i.e. B)
-
Task C’s effective due date will be 1-3-19 [No children]
-
Task B’s effective due date will be 1-1-19 [C: 1-3-19, B’s due date is earlier than EDD of C]
-
Task A’s effective due date will be 1-1-19 [B: 1-1-19, B’s EDD is earlier than A’s due date]
-
Note: comparison of due date with EDDs of children in square brackets

Table for effective due date implementation
4.7. Monitoring time
4.7.1. Current Implementation
Time is of key importance when dealing with the TaskManager. We implement and represent time using the ubiquitous
Date class in Java. The class DueDate internally uses the Date class, and harnesses built in capabilities such as
date comparison. The precision of time for tasks is to the minute, that is the AddCommand can accept a DueDate
accurate to the minute.
A check on whether any of the tasks are overdue is done before the execution of every command.
Design Considerations
Aspect: Implementing the check on whether a task is overdue
-
Alternative 1 (current choice): Run a check before the execution of every command
-
Pros: From a user experience perspective, the user should not expect there to be a commit to state every time a task is overdue. i.e. An undo command should never undo an overdue. Simple implementation prevents race conditions (refer to cons of alternative 2).
-
Cons: If a user does not input a command, the task state will not be updated. (Mitigated by the fact that the number of commands that a person uses likely occurs at a higher rate than the number of tasks itself).
-
-
Alternative 2: Run a cron job that checks at a regular interval if the task is overdue
-
Pros: The overdue state of the task is current
-
Cons: Potential race condition and might introduce latency to the application.
-
4.8. List
4.8.1. Current Implementation
The list command accepts filters that either filter based on the due date of the tasks (relative to the
current date) or the dependencies of the task. This is done using predicates that are given to filter the task list.
Date
The Current Date is retrieved using Java’s Calendar, and is adjusted to be the end of the day, week, or month
depending on the ListCommand 's option. A predicate is then created to check if a given Task is before this date.
Dependency
The dependency of a task is checked using its instance of the Dependency object. A caveat
is that the tasks represented in the Dependency are stored as hashes, requiring the use of a Model to
fetch the task associated to that hashcode, in order to check its completion status.
4.9. Game Manager
The Game Manager is responsible for the gamification aspects of WatchOver.
4.9.1. Structural Overview

The Task Manager owns a GameManager object, which handles the core logic of gamification. All xp calculations are
handled exclusively by the current GameManager.
The GameManager, in turn, owns a GameMode object. GameMode is implemented as an abstract class, and specific
implementations of game modes must extend the abstract GameMode. The GameMode handles the actual appraisal of tasks
for xp, delegated from the GameManager. Individual variations of GameMode will contain their own logic to determine
xp earned, accessible through appraiseXpChange(Task taskFrom, Task taskTo).
4.9.2. Mechanism
When a task is completed, ModelManager::updateTaskStatus(Task target, Task updatedTask) is used to change the
target task into the updated task. TaskManager::appraiseXpChange(target, updatedTask) is then called (from
the current versionedTaskManager instance).
At this point, the TaskManager calls GameManager::appraiseXpChange(Task taskFrom, Task taskTo), passing
control to the gamification component.
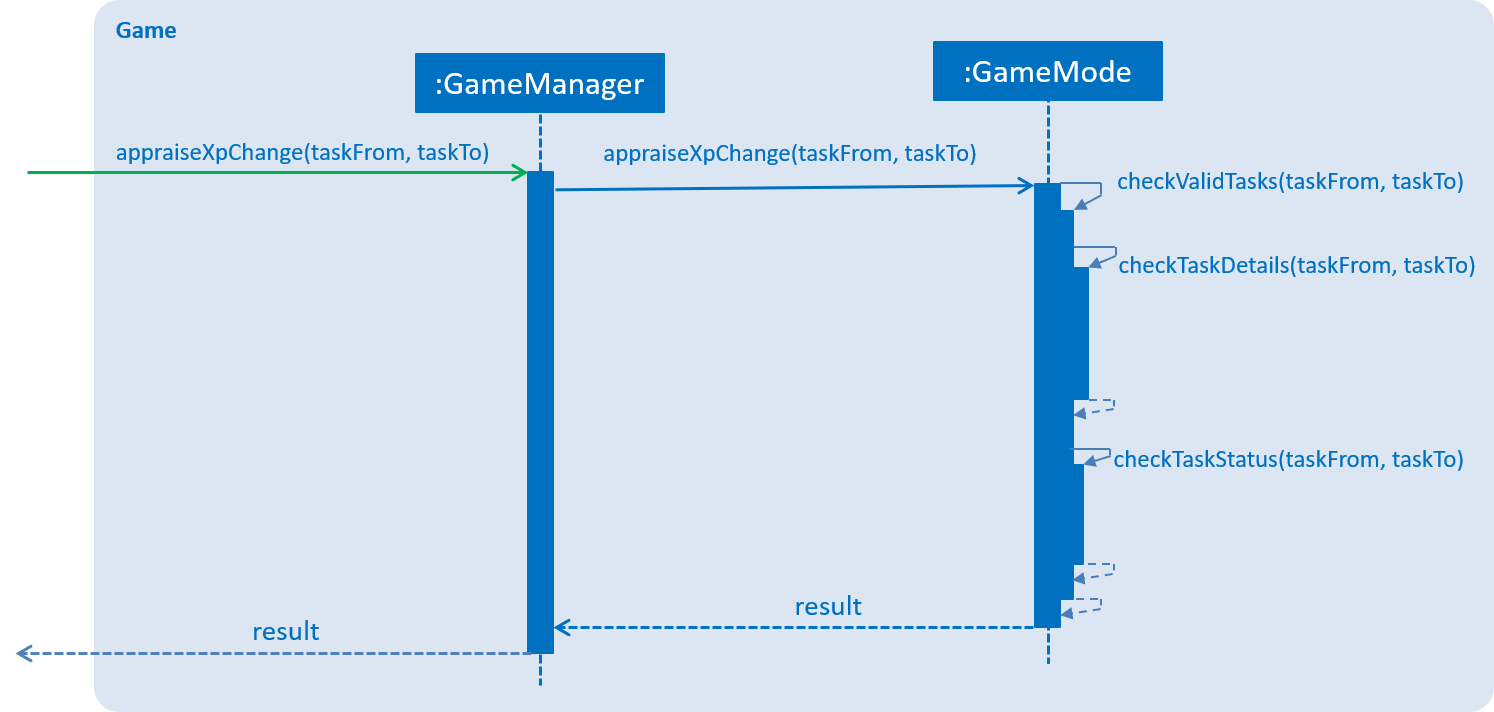
The GameManager delegates the xp calculation to its owned GameMode through
GameMode::appraiseXpChange(Task taskFrom, Task taskTo). The GameMode first checks if the tasks are valid. In
particular, the tasks must be the same tasks (that is, they have the same fields), and the status change must be
a valid change (e.g. from IN_PROGRESS to COMPLETED, and not something like COMPLETED to OVERDUE).
Following that, the GameMode performs the specific calculations unique to each GameMode, to determine the xp
to be awarded.
4.9.3. Storage
The current GameManager is persisted in WatchOver’s storage.
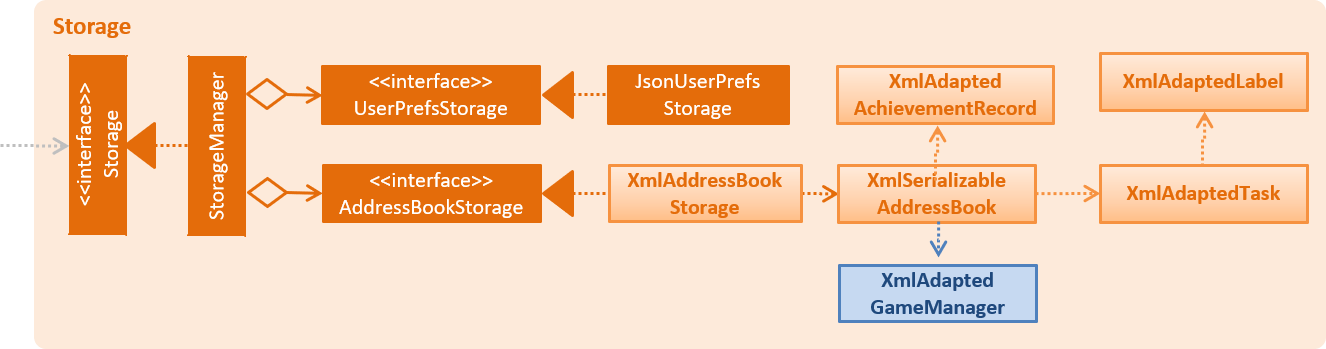
The XmlSerializableTaskManager contains a XmlAdaptedGameManager, to capture the state of the GameManager,
allow persisting state between sessions, and take advantage of the version control to allow undoing and redoing
of changing the game mode.
Four fields are written to file:
-
the game mode,
-
the period,
-
the lower bound of xp awarded, and
-
the higher bound of xp awarded.
The game mode is serialised as the SimpleName of the GameMode subclass in the stored GameManager.
The period is the time before the due date at which the xp awarded by DecreasingMode and IncreasingMode will start
to fall or rise, respectively. Other modes ignore this field.
The lower and higher bound of xp awarded are the scalings to which the game modes peg their xp awards, used by all existing game modes.
Using these fields, the GameManager state can be fully reconstructed.
If an invalid game mode is found written to storage, then the invalid data is ignored and a new default GameManager,
using the default FlatMode set at medium difficulty, will be created, overwriting the invalid data.
4.9.4. Game Manager Design Considerations
Aspect: Location of xp Calculation Logic
-
Alternative 1 (current choice): Using a separate GameManager class to calculate awarded XP.
-
Pros: It is modular and isolated from the rest of the logic, resulting in higher maintainability.
-
Cons: Less flexibility, and will apply flatly across all tasks, with no window for individual variation.
-
-
Alternative 2: Embedding XP calculation logic within task completion logic.
-
Pros: XP awards is primarily used when completing tasks. Placing code here would have relevant code closer together.
-
Cons: It is not modular, resulting in higher coupling and lower maintainability.
-
-
Alternative 3: Embedding XP calculation logic inside each individual task.
-
Pros: This would allow users to set different modes for each individual task, rather than having a one-size-fits-all policy apply to all tasks.
-
Cons: Difficult for user to edit the modes of all tasks at one shot. Additionally, the different modes attached to individual tasks may cause user confusion, especially if the user decides to change mode later but forgets to update previously set tasks. It is best to centralise all calculations to a single type of mode.
-
Aspect: Placement of GameMode Logic
-
Alternative 1 (current choice): Wrapping the
GameModeinside aGameManager-
Pros: Since not all gamification elements are tied to the game mode, this allows future extensibility by creating the scaffolding for future such features to be included, such as in
v2.0. -
Cons: One more layer of abstraction, and additional code and tests need to be written.
-
-
Alternative 2:
TaskManagercontains aGameModedirectly, instead of aGameManager-
Pros: There is less code to write, and the code becomes more readable.
-
Cons: The above is only true so long as
GameModeis the only gamification feature in WatchOver. Once a new feature is added, significant restructuring needs to take place which will break many things.
-
4.9.5. Extensions
Creating a new GameMode
Creating a new GameMode can be done by extending GameMode and implementing the required abstract methods.
Note that the following areas must also be changed to accomodate the new command:
GameMode::setGameMode must handle the new game mode.
GameMode::isValidGameMode must recognise the game mode as an existing mode.
Additionally, if the new game mode requires additional storage, the XmlAdaptedGameManager storage class must be
modified to accomodate the additional stored information.
4.10. Logging
We are using java.util.logging package for logging. The LogsCenter class is used to manage the logging levels and logging destinations.
The logging level can be controlled using the logLevel setting in the configuration file (See Section 3.4, “Configuration”)
The Logger for a class can be obtained using LogsCenter.getLogger(Class) which will log messages according to the specified logging level
Currently log messages are output through: Console and to a .log file.
Logging Levels
SEVERE : Critical problem detected which may possibly cause the termination of the application
WARNING : Can continue, but with caution
INFO : Information showing the noteworthy actions by the App
FINE : Details that is not usually noteworthy but may be useful in debugging e.g. print the actual list instead of just its size
4.11. Configuration
Certain properties of the application can be controlled (e.g App name, logging level) through the configuration file (default: config.json).
5. Documentation
We use asciidoc for writing documentation.
We chose asciidoc over Markdown because asciidoc, although a bit more complex than Markdown, provides more flexibility in formatting.
5.1. Editing Documentation
See UsingGradle.adoc to learn how to render .adoc files locally to preview the end result of your edits. Alternatively, you can download the AsciiDoc plugin for IntelliJ, which allows you to preview the changes you have made to your .adoc files in real-time.
5.2. Publishing Documentation
See UsingTravis.adoc to learn how to deploy GitHub Pages using Travis.
5.3. Converting Documentation to PDF format
We use Google Chrome for converting documentation to PDF format, as Chrome’s PDF engine preserves hyperlinks used in webpages.
Here are the steps to convert the project documentation files to PDF format.
Follow the instructions in UsingGradle.adoc to convert the AsciiDoc files in the docs/ directory to HTML format.
Go to your generated HTML files in the build/docs folder, right click on them and select Open with → Google Chrome.
Within Chrome, click on the Print option in Chrome’s menu.
Set the destination to Save as PDF, then click Save to save a copy of the file in PDF format. For best results, use the settings indicated in the screenshot below.
chrome save as pdf Figure 10. Saving documentation as PDF files in Chrome
5.4. Site-wide Documentation Settings
The build.gradle file specifies some project-specific asciidoc attributes which affects how all documentation files within this project are rendered.
Attributes left unset in the build.gradle file will use their default value, if any. Table 1. List of site-wide attributes Attribute name Description Default value site-name
The name of the website. If set, the name will be displayed near the top of the page.
not set
site-githuburl
URL to the site’s repository on GitHub. Setting this will add a "View on GitHub" link in the navigation bar.
not set
site-seedu
Define this attribute if the project is an official SE-EDU project. This will render the SE-EDU navigation bar at the top of the page, and add some SE-EDU-specific navigation items.
not set
5.6. Site Template
The files in docs/stylesheets are the CSS stylesheets of the site. You can modify them to change some properties of the site’s design.
The files in docs/templates controls the rendering of .adoc files into HTML5. These template files are written in a mixture of Ruby and Slim.
Modifying the template files in docs/templates requires some knowledge and experience with Ruby and Asciidoctor’s API. You should only modify them if you need greater control over the site’s layout than what stylesheets can provide. The SE-EDU team does not provide support for modified template files.
6. Testing
6.1. Running Tests
There are three ways to run tests.
The most reliable way to run tests is the 3rd one. The first two methods might fail some GUI tests due to platform/resolution-specific idiosyncrasies. Method 1: Using IntelliJ JUnit test runner
To run all tests, right-click on the src/test/java folder and choose Run 'All Tests'
To run a subset of tests, you can right-click on a test package, test class, or a test and choose Run 'ABC'
Method 2: Using Gradle
Open a console and run the command gradlew clean allTests (Mac/Linux: ./gradlew clean allTests)
See UsingGradle.adoc for more info on how to run tests using Gradle. Method 3: Using Gradle (headless)
Thanks to the TestFX library we use, our GUI tests can be run in the headless mode. In the headless mode, GUI tests do not show up on the screen. That means the developer can do other things on the Computer while the tests are running.
To run tests in headless mode, open a console and run the command gradlew clean headless allTests (Mac/Linux: ./gradlew clean headless allTests)
6.2. Types of tests
We have two types of tests:
6.2.1. GUI Tests
These are tests involving the GUI. They include:
System Tests that test the entire App by simulating user actions on the GUI. These are in the systemtests package.
Unit tests that test the individual components. These are in seedu.address.ui package.
6.2.2. Non-GUI Tests
These are tests not involving the GUI. They include,
Unit tests targeting the lowest level methods/classes. e.g. seedu.address.commons.StringUtilTest
Integration tests that are checking the integration of multiple code units (those code units are assumed to be working). e.g. seedu.address.storage.StorageManagerTest
Hybrids of unit and integration tests. These test are checking multiple code units as well as how the are connected together. e.g. seedu.address.logic.LogicManagerTest
6.3. Troubleshooting Testing
Problem: HelpWindowTest fails with a NullPointerException.
Reason: One of its dependencies, HelpWindow.html in src/main/resources/docs is missing.
Solution: Execute Gradle task processResources.
7. Dev Ops
7.1. Build Automation
See UsingGradle.adoc to learn how to use Gradle for build automation.
7.2. Continuous Integration
We use Travis CI and AppVeyor to perform Continuous Integration on our projects. See UsingTravis.adoc and UsingAppVeyor.adoc for more details.
7.3. Coverage Reporting
We use Coveralls to track the code coverage of our projects. See UsingCoveralls.adoc for more details.
7.4. Documentation Previews
When a pull request has changes to asciidoc files, you can use Netlify to see a preview of how the HTML version of those asciidoc files will look like when the pull request is merged. See UsingNetlify.adoc for more details.
7.5. Making a Release
Here are the steps to create a new release.
Update the version number in MainApp.java.
Generate a JAR file using Gradle.
Tag the repo with the version number. e.g. v0.1
Create a new release using GitHub and upload the JAR file you created.
7.6. Managing Dependencies
A project often depends on third-party libraries. For example, Address Book depends on the Jackson library for XML parsing. Managing these dependencies can be automated using Gradle. For example, Gradle can download the dependencies automatically, which is better than these alternatives. a. Include those libraries in the repo (this bloats the repo size) b. Require developers to download those libraries manually (this creates extra work for developers)
Appendix A: Suggested Programming Tasks to Get Started Suggested path for new programmers:
First, add small local-impact (i.e. the impact of the change does not go beyond the component) enhancements to one component at a time. Some suggestions are given in Section A.1, “Improving each component”.
Next, add a feature that touches multiple components to learn how to implement an end-to-end feature across all components. Section A.2, “Creating a new command: remark” explains how to go about adding such a feature.
Appendix A: Target User Profile
We target overworked students that like mobile games with positive reinforcement.
-
Needs extrinsic motivation to complete tasks, such as XP system
-
Finds constant affirmation of their progress in the form of preserved statistics over varying time window to be particularly motivational for them.
-
Would like to spice things up with different gamified modes in earning XP.
-
-
Leads a multifaceted life with variation in tasks they need to do
-
Prioritises activities differently
-
Some tasks have natural dependencies on other tasks in their lives
-
Has a high volume of tasks with differing deadlines
-
-
Prefer CLI apps over fancy GUI
Appendix B: Value proposition
By offering a gamified experience, we hope to be able to improve the user experience and keep users motivated in completing their tasks.
Appendix C: User Stories
Priorities: High (must have) - * * *, Medium (nice to have) - * *, Low (unlikely to have) - *
Priority |
As a … |
I want to … |
So that I can … |
* * * |
organised student |
apply lables to my task |
focus on tasks |
* * * |
forgetful student |
alerted of important deadlines |
not forget about tasks |
* * * |
busy person |
easily prioritise tasks |
get important things out of the way first |
* * * |
organised student |
have tasks organised by categories that they are under |
manage different aspects of life better |
* * * |
proactive individual |
view the day’s task at a glance |
I know what I need to do |
* * * |
user |
see task organized between todos and dones |
better organisation |
* * * |
user |
see a list of tasks that needs attention at present time |
I may pay attention to them first |
* * |
long-sighted quantitative person |
overview of my past tasks of the week |
I can track my progress and evaluate how I am doing. |
* * |
user |
have rewards for completing tasks |
continue doing tasks |
* * |
user |
see list of tasks that need my attention most at the present time |
pay attention to them first |
* * |
user |
see QOTD for basic motivation |
motivation |
* * |
user that is demoralized easily |
get positive encouragement |
stay motivated |
* * |
user |
negative reinforcement |
stay motivated |
* * |
user |
statistics function |
keep track of progress |
* * |
user |
insights function |
keep track of progress |
* * |
competitive user |
compete with friends |
challenge myself and peers |
* |
person without arms |
have the computer interpret my words |
type with my toes |
* |
person who hates rules |
enter tasks in a specified format and computer should interpret for me |
easy addition of tasks |
* |
visual person |
colour coding in tasks |
visually discern between tasks |
* |
user |
feedback on completion of tasks |
better plan ways to handle tasks |
* |
lazy student |
provide intuitive information about the chaining to tasks |
easy to tell end of task |
* |
user |
customize persona |
make tasks seem more personal |
* |
unmotivated student |
see tasks creatively explosively destroy themselves |
derive more enjoyment |
Appendix D: Use cases
Only features that require more than a few steps to implement will be shown.
D.1. Use case: List Task
D.1.1. MSS
-
User requests to list tasks, fulfilling a (potentially empty) set of criteria.
-
Application shows a list of corresponding tasks.
Use case ends.
D.1.2. Extensions
-
1a. No matches found.
-
1a1. Application informs user that no tasks matching the specified criteria have been found.
-
Use case ends.
D.2. Use case: Viewing Command History
D.2.1. MSS
-
User requests to view command history.
-
Application displays command history. Use case ends.
D.2.2. Extensions
-
1a. Command history is empty.
-
1a1. Application informs user that there is no command history. Use case ends.
-
D.3. Use case: Add task
D.3.2. Extensions
-
1a. The task already exists.
-
1a1. Application shows an error message.
-
Use case resumes at step 1 in MSS.
-
1b. The user enters the add command in a wrong format.
-
1b1. Application shows an error message.
-
Use case resumes at step 1 in MSS.
D.4. Use case: Add dependency for task
D.4.1. MSS
-
User requests to add a dependency between tasks
-
Application adds the task dependency
Use case ends.
D.4.2. Extensions
-
1a. The additional task dependency creates a cyclic dependency
-
1a1. Application shows an error message, rejects the additional task dependency
-
Use case resumes at step 1 in MSS.
-
1b. The user enters the add dependency command in a wrong format.
-
1b1. Application shows an error message.
-
Use case resumes at step 1 in MSS.
D.5. Use case: Remove dependency for task
D.5.1. MSS
-
User requests to remove a dependency between tasks
-
Application removes the task dependency
Use case ends.
D.5.2. Extensions
-
1a. The user enters the remove dependency command in a wrong format.
-
1a1. Application shows an error message.
-
Use case resumes at step 1 in MSS.
D.6. Use case: Delete task
D.6.1. MSS
-
User requests to delete a task with a particular index
-
Application deletes the task
Use case ends.
D.6.2. Extensions
-
1a. A task with the specified index does not exist.
-
1a1. Application shows an error message.
-
Use case resumes at step 1 in MSS.
-
1b. The task with the specified index is already deleted.
-
1b1. Application shows an error message.
-
Use case resumes at step 1 in MSS.
D.7. Use case: Undoing Last Command
D.7.1. MSS
-
User requests undoing last command.
-
Application resets state to before last state-changing command.
Use case ends.
D.7.2. Extensions
-
1a. Command history is empty.
-
1a1. Application informs user that there is no past history to undo.
-
Use case ends.
D.8. Use case: Redoing Last Command
D.8.1. MSS
-
User requests redoing last command.
-
Application resets state to before last state-changing command was undone.
Use case ends.
D.8.2. Extensions
-
1a. The immediately preceding command (ignoring redone undos) is not an undo command
-
1a1. Application informs user that there is no undo to redo.
-
Use case ends.
D.9. Use case: Completing Task (Single)
D.9.1. MSS
-
User completes a task by specifying the index of the task to complete.
-
Application reports both points earned and tasks completed to the user.
Use case ends.
D.9.2. Extensions
-
1a. The selected task is already completed.
-
1a1. Application displays a relevant error message.
-
Use case ends.
-
1b. The index supplied is invalid.
-
1b1. Application displays a relevant error message.
-
Use case ends.
-
1c. This task to be completed has unfulfilled dependencie(s) that must be completed first.
-
1c1. Application displays a relevant error message.
-
Use case ends.
-
2a. User earns enough points to level up
-
2a1. Application displays a trivial congratulatory message, level achieved, points earned and tasks completed to the user.
-
Use case ends.
D.10. Use case: Completing Task (Batch via Label)
D.10.1. MSS
-
User completes a task by specifying one or more
Label(s) that are tagged to the tasks he wishes to complete. -
Application identifies a completable batch of tasks that contains the specified
Label(s) to be completed and completes them one by one. -
Application reports both points earned and tasks completed to user.
Use case ends.
D.10.2. Extensions
-
1a. The label supplied is invalid
-
1a1. Application displays a relevant error message.
-
Use case ends.
-
2a. There are no completable tasks identified by the label
-
2a1. Application displays a relevant error message.
-
Use case ends.
-
2b. There is an error internally with the application, it tries to complete a task that has already been completed.
-
2b1. Application resets the batch of tasks to their pre-completed state and no points are earned.
-
2b2. Application displays a relevant error message.
-
Use case ends.
-
2c. At least one of tasks identified via label to be completed has unfulfilled dependencie(s) that must be completed first.
-
2c1. Application resets the batch of tasks to their pre-completed state and no points are earned.
-
2c2. Application displays a relevant error message.
-
Use case ends.
-
3a. User earns enough points to level up
-
3a1. Application displays a trivial congratulatory message, level achieved, points earned and tasks completed to the user.
-
Use case ends.
Appendix F: Non-functional requirements
-
There should be no noticable lag when typing on the command line.
-
Should work on any mainstream OS as long as it has Java 9 or higher installed.
-
Storage of application data will be in a text file.
-
Should be able to hold up to 1000 tasks without a noticable decline in performance.
-
Should not take more than 3 seconds to complete a command.
-
System should be maintainable with proper documentation.
-
Proper feedback to user when error occurs.
Appendix G: Glossary
A glossary serves to ensure that all stakeholders have a common understanding of the noteworthy terms, abbreviation, acronyms etc.
| Word | Meaning |
|---|---|
Task |
A piece of work to be completed and is registered by the user |
Application |
Refers to the CLI application registered by the user |
Mainstream OS |
Windows, Linux, Unix, OS-X |
Points |
A unit of measurement to measure current experience |
Level |
A larger unit of measurement to measure experience. |
Appendix H: Instructions for Manual Testing
Given below are instructions to test the app manually.
| These instructions only provide a starting point for testers to work on; testers are expected to do more exploratory testing. |
H.1. Launch and Shutdown
-
Initial launch
-
Download the jar file and copy into an empty folder
-
Double-click the jar file
Expected: Shows the GUI with a set of sample tasks. The window size may not be optimum.
-
-
Saving window preferences
-
Resize the window to an optimum size. Move the window to a different location. Close the window.
-
Re-launch the app by double-clicking the jar file.
Expected: The most recent window size and location is retained.
-
H.2. Effective Due Date field
-
Showcasing Effective due date field
Effective due date is a field in the UI that updates according to command changes.
Effective due date can be seen by selecting the task on task panel with the mouse or by entering the command
select x, where x is the index of the task.
-
Prerequisites:
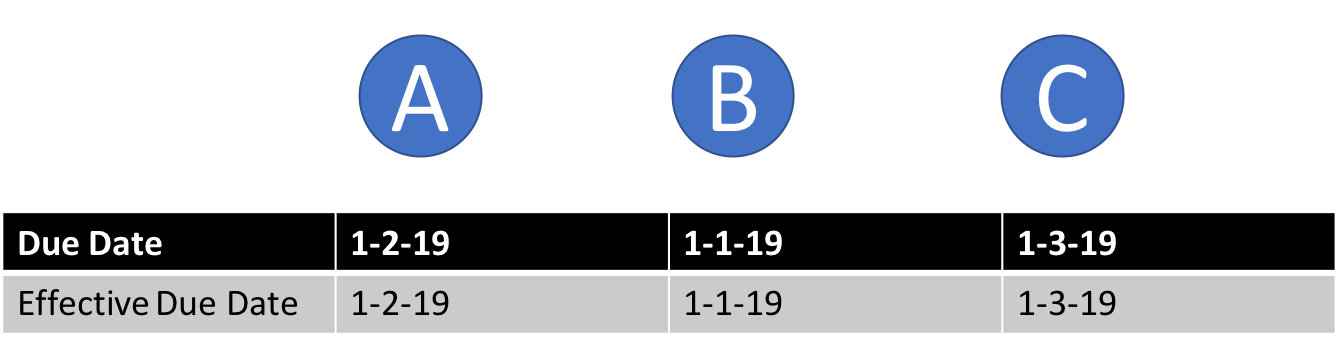
Diagram of Due Dates and Effective Due Dates after pre-requisites are fulfilled
-
Clear task manager with
clear -
Add Task A using
add n/A t/1-2-19 p/5 d/blank -
Add Task B using
add n/B t/1-1-19 p/5 d/blank -
Add Task C using
add n/C t/1-3-19 p/5 d/blank
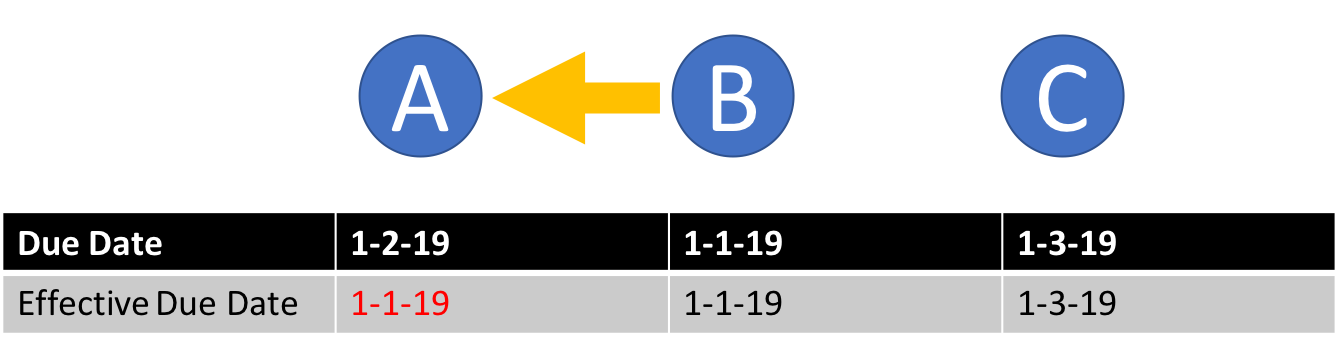
Diagram of Due Dates and Effective Due Dates for test case 1
-
Test case 1:
dependency 2 1,select 1or click on Task A
Expected: Dependency added between task B and task A. Effective due date of A now specifies 1-1-19. Number of dependencies field on the task card updated.
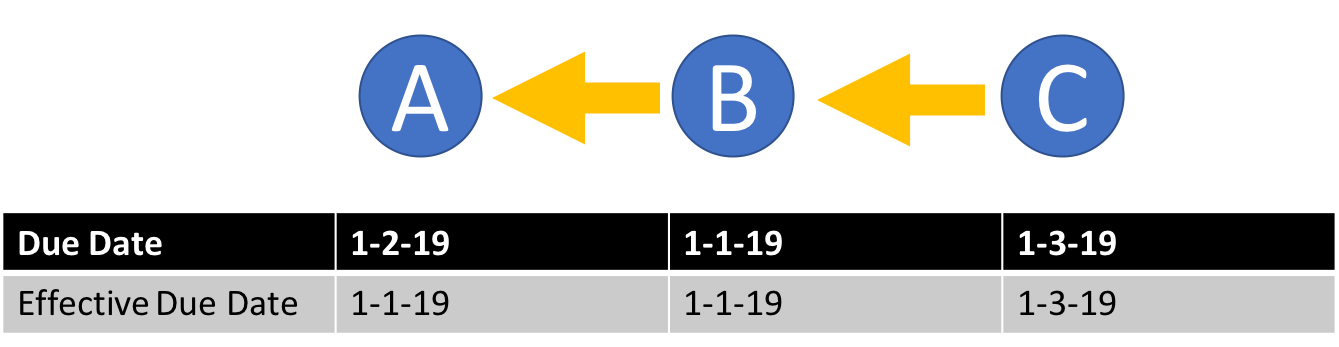
Diagram of Due Dates and Effective Due Dates for test case 2
-
Test case 2:
dependency 2 1+dependency 3 2+select 3or click on task C
Expected: No change to effective due date. Number of dependencies field on the task card updated.
H.3. Achievement Mechanism
-
Update of xp and number of tasks completed on task completion
-
Test case:
complete 1
Expected: Xp value on the achievement panel increases, tasks completed increases by 1. The actual amount of xp value awarded is determined by the current game mode and reported by complete command message. -
Test case:
complete l/tutorial
Expected: Xp value on the achievement panel increases. The actual amount of xp value awarded is determined by the current game mode and reported by complete command message. Tasks completed increases by the number of tasks completed by the batch complete command (as specified in the complete command message).
-
-
Update of level on task completion
-
Prerequisites: change the specified fields in data/taskmanager.xml(or other storage path) to:
<xp>499</xp>
<level>lvl.1</level>
<xpValueByDay>0</xpValueByDay>
<xpValueByWeek>0</xpValueByWeek> -
Test case:
complete 1
Expected: Xp value on the achievement panel increases, and level increases with xp(as the minimum xp of level 2 is 500). The actual amount of xp value awarded is determined by the current game mode and reported by complete command message. The level will always match the updated xp.
-
-
Update of achievement information on undo/redo of complete command.
-
Test case:
complete 1undoredo
Expected: Achievement information updates as specified in the other test cases, changes back to original values onundo, and changes again to the updated values onredo.
-
-
Change of display option on achievement UI
-
Test case:
achievements today
Expected: Achievement panel shows "Daily achievements from [today’s date]:", current level, xp earned and number of tasks completed from the beginning of the day. -
Test case:
achievements this week
Expected: Achievement panel shows "Weekly achievements from [date]:", current level, xp earned and number of tasks completed from the specified date. -
Test case:
achievements all-time
Expected: Achievement panel shows "All-time achievements:", current level, xp earned and number of tasks completed across all time. -
Test case:
achievements all-timeachievements todayundoredo
Expected: Achievement panel shows all-time achievement information followed by today’s achievement information. Onundo, it shows all-time achievement information again and onredo, it shows back today’s achievement information.
-
-
Reset of time-based achievement fields
-
Prerequisites:
-
change the specified fields in data/taskmanager.xml(or other storage path) to:
<xp>400</xp>
<level>lvl.1</level>
<numTaskCompleted>14</numTaskCompleted>
<nextDayBreakPoint>dd-mm-yy 0000</nextDayBreakPoint>(where dd-mm-yy is tomorrow’s date)
<xpValueByDay>200</xpValueByDay>
<numTaskCompletedByDay>5</numTaskCompletedByDay>
<nextWeekBreakPoint>dd-mm-yy 0000</nextWeekBreakPoint>(where dd-mm-yy is today’s date + 7 days)
<xpValueByWeek>300</xpValueByWeek>
<numTaskCompletedByWeek>12</numTaskCompletedByWeek>
-
-
Test case:
-
achievements today -
set the system time of the testing computer to be tomorrow(one day after today)
-
achievements today
Expected: Before system time change,achievements todayshows "Daily achievements from [today’s date]:", today’s xp to be 200, tasks completed to be 5. After system time change,achievements todayshows "Daily achievements from [tomorrow’s date]:", this day’s xp to be 0, tasks completed to be 0. All-time xp value remains 400, tasks completed remains 14. This week’s xp value remains 300, tasks completed remains 12.
-
-
Test case:
-
achievements this week -
set the system time of the testing computer to be next week(7 days after today)
-
achievements this week -
achievements today
Expected: Before system time change,achievements this weekshows "Weekly achievements from [today’s date]:", this week’s xp to be 300, tasks completed to be 12. After system time change,achievements this weekshows "Weekly achievements from [next week’s date]:", this week’s xp to be 0, tasks completed to be 0. Now,achievements todayshows "Daily achievements from [next week’s date]:", this day’s xp to be 0, tasks completed to be 0.
-
-
-
Detection of invalid/corrupted achievement information from storage
change the specified fields in data/taskmanager.xml(or other storage path) to:-
Test case:
<displayOption>5</displayOption>(invalid display option) -
Test case:
<xp>59</xp><level>lvl.2</level>(non-matching xp value and level) -
Test case:
<xp>559</xp><xpValueByDay>90</xpValueByDay><xpValueByWeek>60</xpValueByWeek>
(Inconsistent xp values. All-time xp should never be smaller than this week’s xp, which should never be smaller than today’s xp.) -
Test case:
<numTaskCompleted>10</numTaskCompleted><numTaskCompletedByDay>12</numTaskCompletedByDay><numTaskCompletedByWeek>12</numTaskCompletedByWeek>
(Inconsistent number of tasks completed. All-time number should never be smaller than this week’s number, which should never be smaller than today’s number.) -
Test case:
<nextDayBreakPoint>12-11-18 0000</nextDayBreakPoint><nextWeekBreakPoint>19-11-18 0000</nextWeekBreakPoint>
(Inconsistent date breakpoints.nextWeekBreakPointshould never be earlier thannexDayBreakPoint, it should never be 7 days or more later than nexDayBreakPoint.) -
Test case:
<xp>1000000001</xp>
(The maximum integer value maintained by achievement record is 1000000000.)
-
Expected: Due to the invalid data fields, the data file is considered corrupted and task manager is initialized with an empty data file. Task manager will be empty.
H.4. Adding or removing a dependency
-
Adding a dependency when all tasks are listed
-
Prerequisites: List all tasks using the
listcommand, at least 2 or more tasks in Task Manager -
Test case:
dependency 1 2
Expected: Dependency added between task at index 1 to task at index 2. Details of added dependency shown on screen. Timestamp in the status bar is updated. Number of dependencies field on the task card updated. -
Test case:
dependency 0 0
Expected: No dependency added. Error details shown in the status message. Status bar remains the same. -
Other incorrect dependency commands to try:
dependency,dependency x 1(where x is larger than the list size), adding a dependency that will cause a cyclic dependency
Expected: Similar to previous.
-
-
Deleting a dependency when all tasks are listed and dependency present
-
Prerequisites: List all persons using the
listcommand, dependency betweenTaskat index 1 andTaskat index 2 already exists -
Test case:
dependency 1 2
Expected: Dependency removed betweenTaskat index 1 toTaskat index 2. Details of removed dependency shown on screen. Timestamp in the status bar is updated. Number of dependencies field on the task card updated. -
Other incorrect dependency commands to try:
dependency,dependency x 1(where x is larger than the list size), adding a dependency that will cause a cyclic dependency
Expected: Similar to previous.
-
H.5. Deleting task where there exists dependencies to deleted task
-
Deleting a task where there exists dependencies to deleted task
-
Prerequisites:
-
Clear task manager with
clear -
Add Task A using
add n/A t/1-2-19 p/5 d/blank -
Add Task B using
add n/B t/1-1-19 p/5 d/blank -
Add dependency from B to A using
dependency 2 1
-
-
Test case:
delete 1
Expected: Only task B remaining. Task B has 0 dependencies instead of its previous value of 1.
-
H.6. Editing task where there exists dependencies to edited task
-
Editing a task where there exists dependencies to the edited task
-
Prerequisites:
-
Clear task manager with
clear -
Add Task A using
add n/A t/1-2-19 p/5 d/blank -
Add Task B using
add n/B t/1-1-19 p/5 d/blank -
Add dependency from B to A using
dependency 2 1
-
-
Test case:
edit 1 n/C
Expected: Name of 1st task changed to C. Number of dependencies of B remains the same.
-
H.7. Interactions of Complete Command with Dependencies
| As the standard output for Complete Command is quite verbose, we shall alias "standard output" to mean "Xp change, new level acquired (if any) and Task(s) Completed is/are shown to user." |
H.7.1. Index based interactions
-
Expected interactions without dependencies
-
Prerequisites:
-
Clear task manager with
clear -
Add Task A using
add n/A t/1-2-19 p/5 d/blank -
Add Task B using
add n/B t/1-1-19 p/5 d/blank -
Add a dependency from Task A to Task B using
dependency 1 2
-
-
Test case 1:
complete 2, Expected: Task B is completed, followed by its standard output. -
Test case 2:
complete 1, Expected: An error message is shown to the user as Task A is dependent on Task B, i.e. requires Task B to be completed first. -
Test case 3:
complete 2, followed bycomplete 1Expected: Task B is completed, followed by its standard output. Task A is completed, followed by its standard output.
-
H.7.2. Label based interactions
-
Expected interactions without dependencies
-
Prerequisites:
-
Clear task manager with
clear -
Add Task A using
add n/A t/1-2-19 p/5 d/blank l/one -
Add Task B using
add n/B t/1-1-19 p/5 d/blank l/two -
Add a dependency from Task A to Task B using
dependency 1 2
-
-
Test case 1:
complete l/two, Expected: Task B is completed, followed by its standard output. -
Test case 2:
complete l/one, Expected: An error message is shown to the user as Task A is dependent on Task B, i.e. requires Task B to be completed first. -
Test case 3:
complete l/one l/two, Expected: Both Task A and Task B are completed in no defined order, followed by its standard output.
-
H.8. List topological order of tasks
-
List topological order of tasks
-
Prerequisites: -
-
Test case:
topoorder
Expected: A sequence of possible valid sequence of tasks to tackle given existing task dependency constraints will be displayed in the window below the command line.
-
H.9. Game Mode testing
-
Displaying current mode
-
Prerequisites: -
-
Test case:
modeExpected: Current game mode details will be shown.
For example,
You are currently using the Priority mode!
Completing a task will earn you 6 times the priority value as xp, or 3 times if the task is overdue.
-
-
Changing game mode
-
Prerequisites: -
-
Test case:
mode decreasing easy
mode
mode increasing extreme
modeExpected: Description shown will be different during both invocations of
mode.
-
-
Correct xp awarded in Flat mode
-
Prerequisites:
Set game mode by runningmode flat -
Test case:
clear
add n/Task One t/01-01-2019 p/1 d/Some description
edit 1 t/01-01-2018
add n/Task Two t/31-12-2019 p/1 d/Some description
complete 1
complete 2Expected:
Task One is overdue, and should award 30 xp under Flat mode, medium difficulty.
Task Two is on time, and should award 60 xp.
-
-
Correct xp awarded in Increasing mode
-
Prerequisites:
Set game mode by runningmode increasing -
Test case:
clear
add n/Task One t/01-01-2019 p/1 d/Some description
edit 1 t/01-01-2018
add n/Task Two t/31-12-2019 p/1 d/Some description
complete 1
complete 2Expected:
Task One is overdue, and should award 60 xp under Increasing mode, medium difficulty.
Task Two is on time, and should award 30 xp.
Setting Task Two to a different date within 3 days of the current date should award xp in between 30 xp and 60 xp.
-
-
Correct xp awarded in Decreasing mode
-
Prerequisites: Set game mode by running
mode decreasing -
Test case:
clear
add n/Task One t/01-01-2019 p/1 d/Some description
edit 1 t/01-01-2018
add n/Task Two t/31-12-2019 p/1 d/Some description
complete 1
complete 2Expected:
Task One is overdue, and should award 30 xp under Decreasing mode, medium difficulty.
Task Two is on time, and should award 60 xp.
Setting Task Two to a different date within 3 days of the current date should award xp in between 30 xp and 60 xp.
-
-
Correct xp awarded in Priority mode
-
Prerequisites: Set game mode by running
mode priority -
Test case:
clear
add n/Task One t/31-12-2019 p/1 d/Some description
add n/Task Two t/31-12-2019 p/10 d/Some description
add n/Task Three t/01-01-2019 p/1 d/Some description
add n/Task Four t/01-01-2019 p/10 d/Some description
edit 3 t/01-01-2018
edit 4 t/01-01-2018
complete 1
complete 2
complete 3
complete 4Expected:
Task One has priority value 1 and is not overdue, and should award 6 xp under Priority mode, medium difficulty.
Task Two has priority value 10 and is not overdue, and should award 60 xp.
Task Three has priority value 1 and is overdue, and should award 3 xp.
Task Four has priority value 10 and is overdue, and should award 30 xp.
-
-
Correct xp awarded in various game difficulties
-
Prerequisites: -
-
Test case:
clear
mode flat easy
add n/Task One t/31-12-2019 p/1 d/Some description
complete 1
mode flat extreme
add n/Task Two t/31-12-2019 p/1 d/Some description
complete 2Expected:
Task One was completed in Easy mode, and should award 50 xp.
Task Two was completed in Extreme mode, and should award 80 xp.
-
-
Game mode persists between sessions
-
Prerequisites: -
-
Test case:
mode
exit
Restart application
modeExpected: Mode should remain the same before and after exiting
-
-
Change of game mode can be undone
-
Prerequisites: -
-
Test case:
mode priority easy
mode
mode flat extreme
mode
undo
mode
redo
modeExpected:
Undoing will return the mode to the previous Priority mode, and redoing will restore the subsequent Flat mode.
-
H.10. List filter results
-
Expected results for time-based filters
-
Prerequisites:
-
Clear task manager with
clear -
Add Task A using
add n/A p/5 d/due today l/one t/X YwhereXis today’s date and Y is a time before the end of the day -
Add Task B using
add n/B p/5 d/due before sunday l/two t/X YwhereXis any valid date before the end of the week andYis any valid time -
Add Task C using
add n/C p/5 d/due before end of month l/two t/X YwhereXis any valid date before the end of the month andYis any valid time
-
-
Test case 1:
list f/today, Expected: Only Task A is listed. -
Test case 2:
list f/week, Expected: Only Task B is listed. -
Test case 3:
list f/month, Expected: Only Task C is listed.
-
-
Expected results for dependency-based filter (
doable)-
Prerequisites:
-
Clear task manager with
clear -
Add Task A using
add n/A t/1-1-19 p/5 d/blank l/two -
Add Task B using
add n/B t/1-1-19 p/5 d/blank l/two -
Add Task C using
add n/C t/1-1-19 p/5 d/blank l/two -
List all tasks using
list -
Add a dependency from A to B using
dependency 1 2
-
-
Test case 1:
list f/doable, Expected: Tasks B and C are listed. -
Test case 2:
list,complete 2,list f/doable, Expected: Tasks A and C are listed.
-
H.11. Task View Panel
-
Expected view for selecting tasks
-
Prerequisites:
-
Clear task manager with
clear -
Add Task A using
add n/A t/1-1-19 p/5 d/blank l/two -
Add Task B using
add n/B t/1-1-19 p/5 d/blank l/two
-
-
Test case 1:
select 1, Expected: Task A is selected and its details are displayed on the Task View Panel on the right hand side. -
Test case 2:
select 2, Expected: Task B is selected and its details are displayed on the Task View Panel on the right hand side. -
Test case 3:
edit 2 n/C, Expected: Task B is edited to become Task C, gets selected and its details are displayed on the Task View Panel on the right hand side. -
Test case 3:
edit 2 n/C, Expected: Task B is edited to become Task C, gets selected and its details are displayed on the Task View Panel on the right hand side.
-